Full Stack Reactive with Spring WebFlux, WebSockets, and React
Spring WebFlux can be used to create a REST API with streaming data. Spring WebFlux can also be integrated with WebSockets to provide notifications that clients can listen to. Combining the two is a powerful way to provide real-time data streaming to JavaScript or mobile clients. Add React to the mix and you have an excellent foundation for a full-stack reactive architecture.
React is a UI toolkit (similar to GWT) that lets you build components with JavaScript (or TypeScript) and JSX. JSX is how you define elements in React and it looks very similar to XML. React’s API and JSX are the core of the framework; everything else is an add-on. I won’t go into nitty-gritty details about React, we’ll assume you’ve heard of it and are eager to learn how to make it even more reactive!
 I teamed up with Josh Long to write this post. Josh is a fellow Java Champion, Spring Developer Advocate, and all around excellent guy at Pivotal. Josh and I’ve been good friends for a while now, sharing the same passion for Java, developers, and building bleeding-edge applications. We hope you like this series!
Today, we’ll show you how to build a full-stack application using Spring WebFlux for the API, WebSockets for notifications, and React for the UI. This article is the third in a three-part series about reactive programming and Spring WebFlux. The first two are listed below.
Reactiveness in Spring WebFlux and React
You hear might hear the term reactive a lot when you read about JavaScript frameworks. When you hear this term in the Java community, it usually refers to asynchronous I/O and non-blocking processes. Spring WebFlux provides an implementation of the reactive streams specification, which is a standard for asynchronous stream processing with non-blocking back pressure.
The term "reactive" is a bit different in the JavaScript community. It typically refers to how a UI reacts to events happening in other parts of the app. JavaScript does asynchronous processing by default and this can be very useful on the client so as to prevent the browser from locking up.
So how do you go full-stack reactive and create an architecture that can handle streaming data from the server, and constantly update the client? You can use many techniques, and I’ll show you a few today.
Some of your favorite web apps probably seem like they do real-time processing. They’re constantly sending notifications and updating the UI based on events. This is because they contain code that listens (or polls) for server-side events.
Get Started with Spring WebFlux and WebSockets
In the last post from this series, we built a /profiles endpoint and a /ws/profiles WebSocket endpoint. To begin, clone the repository from GitHub:
git clone https://github.com/oktadeveloper/okta-spring-webflux-react-example.git full-stack-reactive
Rather than messing with security right away, you can disable Spring Security by commenting out its dependencies in reactive-web/pom.xml:
<!--<dependency>
    <groupId>org.springframework.boot</groupId>
    <artifactId>spring-boot-starter-security</artifactId>
</dependency>
<dependency>
    <groupId>org.springframework.security</groupId>
    <artifactId>spring-security-oauth2-client</artifactId>
</dependency>
<dependency>
    <groupId>org.springframework.security</groupId>
    <artifactId>spring-security-oauth2-resource-server</artifactId>
</dependency>
<dependency>
    <groupId>org.springframework.security</groupId>
    <artifactId>spring-security-oauth2-jose</artifactId>
</dependency>-->
You’ll also need to comment out all the code in reactive-web/src/main/java/…/SecurityConfiguration.java.
You’ll need to have a MongoDB database instance running on your local machine on the default host, port, and accessible with the default username and password. If you’re on a Mac, you can install it using brew install mongodb. If you’re on Debian-based Linux distributions, you can use apt install mongodb. You can start MongoDB by running mongod.
You can start the application using ./mvnw spring-boot:run in the reactive-web directory. If you hit its /profiles endpoint with HTTPie, you’ll see there’s no data.
$ http :8080/profiles
HTTP/1.1 200 OK
Content-Type: application/json;charset=UTF-8
transfer-encoding: chunked

[]
To run this API with demo data, run SPRING_PROFILES_ACTIVE=demo ./mvnw spring-boot:run. This will cause the SampleDataInitializer to create a few generic profiles in MongoDB.
$ http :8080/profiles
HTTP/1.1 200 OK
Content-Type: application/json;charset=UTF-8
transfer-encoding: chunked
[
{
"email": "A@email.com",
"id": "21f458fd-f718-4bcb-807d-b54d730433b9"
},
{
"email": "C@email.com",
"id": "6f470aef-a04b-4bf8-bd66-44d29c724c0b"
},
{
"email": "B@email.com",
"id": "84bab375-e8e3-4c86-b3d0-f4fc65987767"
},
{
"email": "D@email.com",
"id": "111249b2-e85b-4772-a610-f5ac5e496705"
}
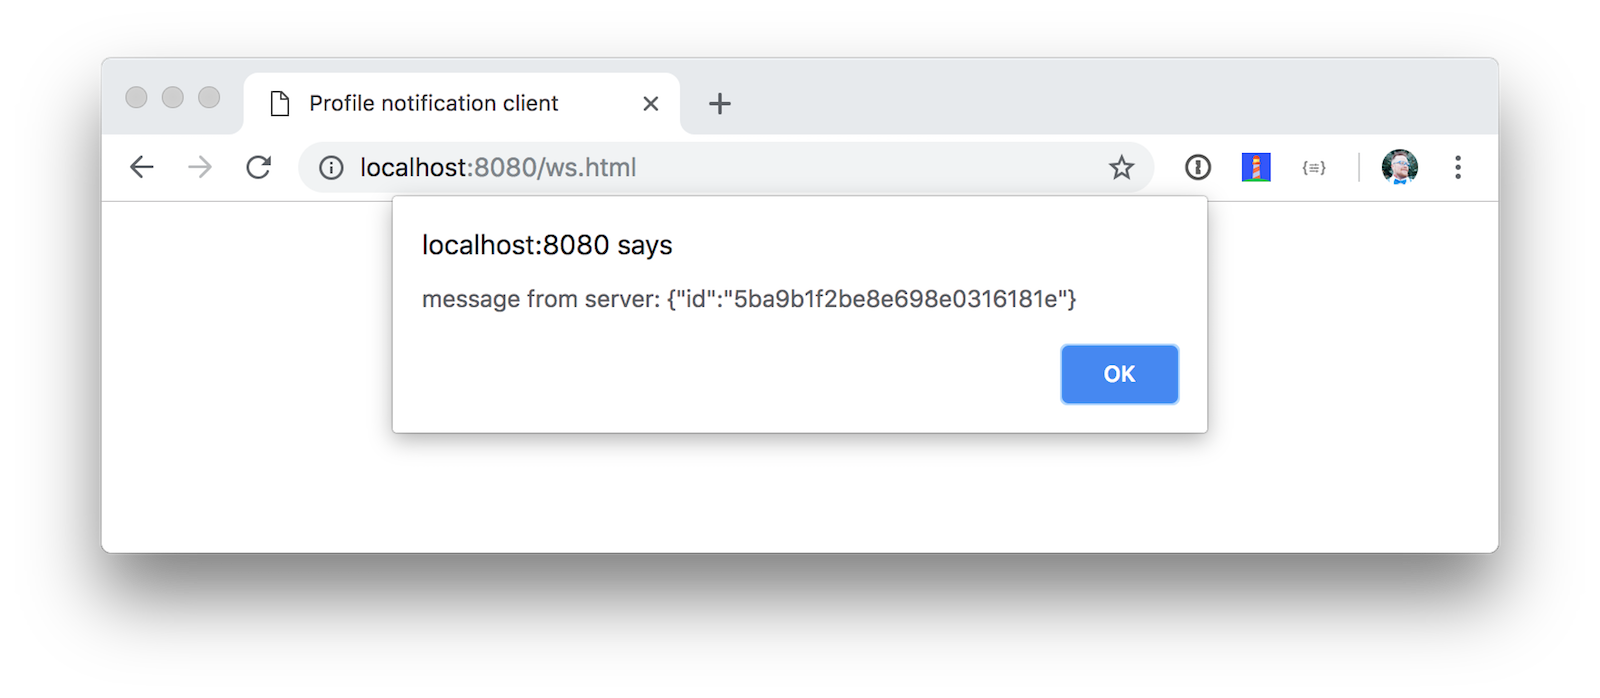
]Open your browser to http://localhost:8080/ws.html and you’ll be greeted with a blank page. This page contains a WebSocket listener that produces alerts when new profiles are added.
<script>
  var socket = new WebSocket('ws://localhost:8080/ws/profiles');
  socket.addEventListener('message', function (event) {
    window.alert('message from server: ' + event.data);
  });
</script>
There’s a create.sh script you can run to create new profiles. When you run it, you’ll see alerts in your browser.
Pretty slick, eh? You have an API that provides a REST endpoint in a non-blocking fashion, and it notifies you when new data arrives!
Now let’s see how you can handle this data with React.
Create an App with React
I recently did a poll to see what my Twitter followers preferred when developing React apps: JavaScript or TypeScript.
For those of you developing with @reactjs, do you prefer to use JavaScript or TypeScript?
— Matt Raible (@mraible) September 22, 2018
Since most people voted for TypeScript, and we happen to like it ourselves, we’ll show you how to create a React app with Create React App and TypeScript.
Open a terminal window, navigate to the full-stack-reactive directory, and run the following command. This will install create-react-app, create a react-app directory and files, install all of its dependencies, and add TypeScript support.
npx create-react-app react-app --typescript
cd react-app
Create a ProfileList Component to Fetch Data from Your Spring WebFlux API
Create a react-app/src/ProfileList.tsx component that fetches data from the /profiles endpoint.
import React, { Component } from 'react';

interface Profile {
  id: number;
  email: string;
}

interface ProfileListProps {
}

interface ProfileListState {
  profiles: Array<Profile>;
  isLoading: boolean;
}

class ProfileList extends Component<ProfileListProps, ProfileListState> {

  constructor(props: ProfileListProps) {
    super(props);

    this.state = {
      profiles: [],
      isLoading: false
    };
  }

  async componentDidMount() {
    this.setState({isLoading: true});

    const response = await fetch('http://localhost:3000/profiles');
    const data = await response.json();
    this.setState({profiles: data, isLoading: false});
  }

  render() {
    const {profiles, isLoading} = this.state;

    if (isLoading) {
      return <p>Loading...</p>;
    }

    return (
      <div>
        <h2>Profile List</h2>
        {profiles.map((profile: Profile) =>
          <div key={profile.id}>
            {profile.email}<br/>
          </div>
        )}
      </div>
    );
  }
}

export default ProfileList;
To make this component render when your app loads, replace the code in App.tsx with the following.
import React, { Component } from 'react';
import logo from './logo.svg';
import './App.css';
import ProfileList from './ProfileList';

class App extends Component {
  render() {
    return (
      <div className="App">
        <header className="App-header">
          <img src={logo} className="App-logo" alt="logo" />
          <ProfileList/>
        </header>
      </div>
    );
  }
}

export default App;
Before your React app can talk to your API, you’ll need to proxy the requests from http://localhost:3000/profiles to http://localhost:8080/profiles. You can do this by adding a proxy setting to react-app/package.json.
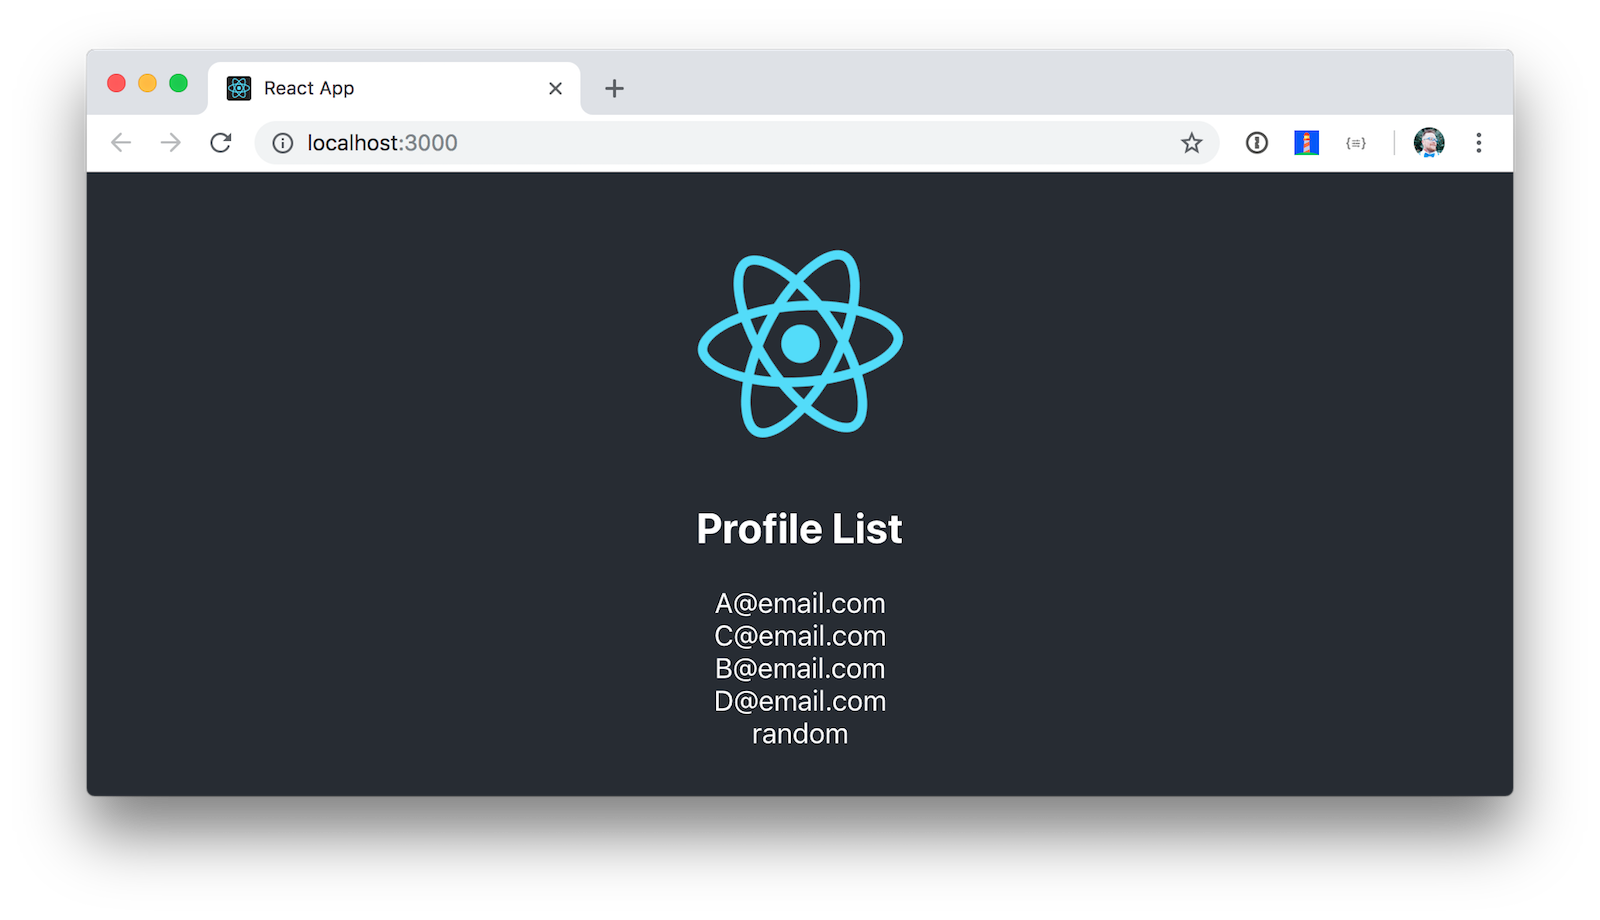
"proxy": "http://localhost:8080"Restart your Spring Boot app and start your React app with npm start. You should see a list of profiles at http://localhost:3000.
Techniques for Streaming Data with React
Displaying data from your reactive API is cool, but wouldn’t it be cooler if your UI was updated when new profiles were added? There are several ways you can implement this behavior, and I’ll show you a few options today. It’s possible this could change if y’all send us some better ideas. 😉
Polling with Interval
The easiest, and most costly, technique you can implement is to poll the server for new data every few seconds. The code below explains how this works.
import React, { Component } from 'react';

interface Profile {
  id: number;
  email: string;
}

interface ProfileListProps {
}

interface ProfileListState {
  profiles: Array<Profile>;
  isLoading: boolean;
}

class ProfileList extends Component<ProfileListProps, ProfileListState> {
  private interval: any; (1)

  constructor(props: ProfileListProps) {
    super(props);

    this.state = {
      profiles: [],
      isLoading: false
    };
  }

  async fetchData() {
    this.setState({isLoading: true});

    const response = await fetch('http://localhost:3000/profiles');
    const data = await response.json();
    this.setState({profiles: data, isLoading: false});
  }

  async componentDidMount() {
    await this.fetchData(); (2)
    this.interval = setInterval(() => this.fetchData(), 1000); (3)
  }

  componentWillUnmount() {
    clearInterval(this.interval);
  }

  render() {
    const {profiles, isLoading} = this.state;

    if (isLoading) {
      return <p>Loading...</p>;
    }

    return (
      <div>
        <h2>Profile List</h2>
        {profiles.map((profile: Profile) =>
          <div key={profile.id}>
            {profile.email}<br/>
          </div>
        )}
        <a href="/" className="App-link">Home</a>
      </div>
    );
  }
}

export default ProfileList;| 1 | Define a local interval variable so fetching will stop when the component is unmounted. |
| 2 | Call fetchData() to get the initial set of data when component is mounted. |
| 3 | Call fetchData() every 1000 milliseconds, or 1 second. |
To test that this works, replace the code in ProfileList.tsx with the code above. Then add a create-stream.sh file to your react-app directory and populate it with the following:
#!/bin/bash
port=${1:-8080}
count=0

profile () {
  ((count++))
  echo "posting #${count}"
  http POST http://localhost:${port}/profiles email="random${count}"
  if [ $count -gt 120 ]
  then
    echo "count is $count, ending..."
    break
  fi
}

while sleep 1; do profile; done
This creates a new profile record every one second, for 120 seconds. You will need to install HTTPie before running this script. Run it, open http://localhost:3000, and you should see the list getting refreshed as new data is added.
You’ll probably notice it’s a jarring experience because the list flickers as more data is added.
Polling with RxJS
A better way to do polling is with RxJS. You can install it using npm.
npm i rxjs@6.5.2
You can replace the fetchData(), componentDidMount(), and componentWillUnmount() with a single componentDidMount() method.
import { interval } from 'rxjs';
import { startWith, switchMap } from 'rxjs/operators';
// other imports

class ProfileList extends Component<ProfileListProps, ProfileListState> {

  // constructor()

  async componentDidMount() {
    this.setState({isLoading: true});

    const request = interval(1000).pipe( (1)
      startWith(0), (2)
      switchMap(() => (3)
        fetch('http://localhost:3000/profiles')
          .then((response) => response.json())
      ));

    request.subscribe((data: any) => { (4)
      this.setState({profiles: data, isLoading: false});
    })
  }

  // render()
}

export default ProfileList;| 1 | Start an interval Observable, running every one second. |
| 2 | startWith indicates that it should fetch right away, which makes it so you don’t need an initial data fetch. |
| 3 | switchMap has a canceling effect, which is different from other flattening operators. On each emission, the previous inner observable (the result of fetch()) is canceled and the new observable is subscribed. Use mergeMap if you need every request to complete. |
Restart your server to start with default data again, run create-stream.sh, and open your browser to http://localhost:3000. You’ll notice the profiles are updating, and there’s no flicker in the page.
Fetching new data every few seconds is expensive and silly. Wouldn’t it be cooler to take advantage of the WebSocket endpoint that notifies when new data arrives?!
Real-time Data with WebSockets
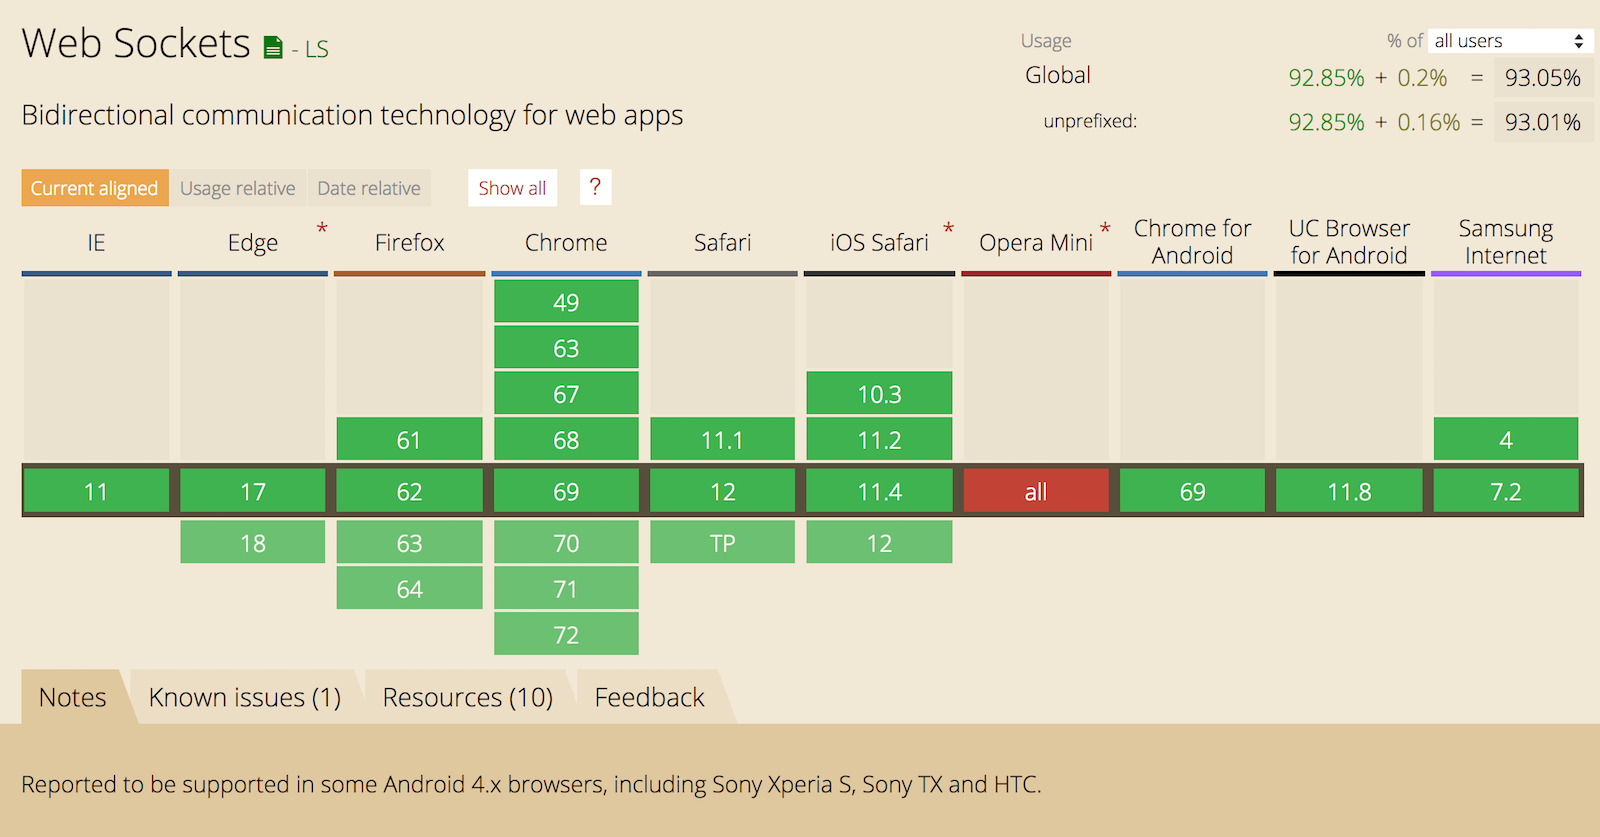
You don’t need to install anything to use WebSockets. They’re supported by most modern browsers. Below is a report from caniuse.com.
With WebSockets, you just need a single componentDidMount() and no additional imports.
// imports

class ProfileList extends Component<ProfileListProps, ProfileListState> {

  // constructor()

  async componentDidMount() {
    this.setState({isLoading: true});

    const response = await fetch('http://localhost:3000/profiles');
    const data = await response.json();
    this.setState({profiles: data, isLoading: false});

    const socket = new WebSocket('ws://localhost:3000/ws/profiles'); (1)
    socket.addEventListener('message', async (event: any) => { (2)
      const profile = JSON.parse(event.data);
      this.state.profiles.push(profile);
      this.setState({profiles: this.state.profiles}); (3)
    });
  }

  // render()
}

export default ProfileList;| 1 | Create a new WebSocket. |
| 2 | Listen for new profiles. |
| 3 | Update the profiles using setState(). Without this line, the UI won’t be updated. |
You will also need to create src/setupProxy.js so it proxies WebSocket requests.
const proxy = require("http-proxy-middleware")

module.exports = app => {
  app.use(proxy("/ws", {target: "http://localhost:8080", ws: true}))
}
After adding this file, you will need to restart your client for it to take effect.
WebSockets make it easy to get notifications from a WebFlux API, don’t they?!
Listening for Server-Sent Events (SSE)
One last technique I’d like to show you is server-sent events (SSE). With SSE, it’s possible for a send new data to a web client at any time, by pushing messages. Create a ServerSentEventController.java class and fill it with the following Java code.
reactive-web/src/main/java/com/example/demo/ServerSentEventController.javapackage com.example.demo;
import com.fasterxml.jackson.core.JsonProcessingException;
import com.fasterxml.jackson.databind.ObjectMapper;
import org.springframework.http.MediaType;
import org.springframework.web.bind.annotation.CrossOrigin;
import org.springframework.web.bind.annotation.GetMapping;
import org.springframework.web.bind.annotation.RestController;
import reactor.core.publisher.Flux;
@RestController
public class ServerSentEventController {
private final Flux<ProfileCreatedEvent> events;
private final ObjectMapper objectMapper;
public ServerSentEventController(ProfileCreatedEventPublisher eventPublisher, ObjectMapper objectMapper) {
this.events = Flux.create(eventPublisher).share(); (1)
this.objectMapper = objectMapper;
}
@GetMapping(path = "/sse/profiles", produces = MediaType.TEXT_EVENT_STREAM_VALUE) (2)
@CrossOrigin(origins = "http://localhost:3000") (3)
public Flux<String> profiles() {
return this.events.map(pce -> {
try {
return objectMapper.writeValueAsString(pce) + "\n\n"; (4)
} catch (JsonProcessingException e) {
throw new RuntimeException(e);
}
});
}
}| 1 | The .share() method is important to allow multiple clients to consume your data. |
| 2 | You must use MediaType.TEXT_EVENT_STREAM_VALUE to indicate you’ll be sending streaming text. |
| 3 | You have to allow access from the React app’s origin because Create React App’s proxy doesn’t support SSE. |
| 4 | Return the ProfileCreatedEvent as a JSON string. I added the two carriage returns because a reader commented that they needed them. |
On the React side of things, you can use EventSource to listen for new profiles. Change your ProfileList component to use EventSource as follows.
// imports

class ProfileList extends Component<ProfileListProps, ProfileListState> {

  // constructor()

  async componentDidMount() {
    this.setState({isLoading: true});
    const response = await fetch('http://localhost:3000/profiles');
    const data = await response.json();
    this.setState({profiles: data, isLoading: false});

    const eventSource = new EventSource('http://localhost:8080/sse/profiles'); (1)
    eventSource.onopen = (event: any) => console.log('open', event); (2)
    eventSource.onmessage = (event: any) => {
      const profile = JSON.parse(event.data).source; (3)
      this.state.profiles.push(profile);
      this.setState({profiles: this.state.profiles}); (4)
    };
    eventSource.onerror = (event: any) => console.log('error', event);
  }

  // render()
}

export default ProfileList;| 1 | Create a new EventSource, using port 8080 since you can’t proxy server-sent events. |
| 2 | Log when the channel is open. This was helpful to discover the issue with proxies because it was called, but onmessage() was not. |
| 3 | Parse event.data, then grab the source from that. |
| 4 | Remember to use setState() to update your UI! |
If you restart your server, add some streaming data with create-stream.sh, you should see the screen constantly updating.
You’ve learned how to add real-time streaming abilities to your React app, but what about security? A system that broadcasts to everyone that’s listening isn’t going to work well, especially if we start adding sensitive data!
Secure Your React App with OpenID Connect (OIDC)
OIDC requires an identity provider (or IdP). You can use many well-known ones like Google or Facebook, but those services don’t allow you to manage your users as you would in Active Directory. Okta allows this, and you can use Okta’s API for OIDC.
I’d encourage you to signup for an Okta developer account, so you can learn how to secure your full stack reactive app. If you already have an account, great! Just follow the steps below to create a new OIDC app.
Create an OIDC App in Okta
Log in to your Okta Developer account and navigate to Applications > Add Application. Click Web and click Next. Give the app a name you’ll remember, specify http://localhost:8080/login/oauth2/code/okta and http://localhost:3000/implicit/callback as Login redirect URIs and click Done. Then edit the project and enable "Implicit (Hybrid)" as a grant type (allow ID and access tokens) and click Save.
Copy and paste the URI of your default authorization server, client ID, and the client secret into reactive-web/src/main/resources/application.yml.
oidc:
  issuer-uri: https://{yourOktaDomain}/oauth2/default
  client-id: {clientId}
  client-secret: {clientSecret}

spring:
  security:
    oauth2:
      client:
        provider:
          okta:
            issuer-uri: ${oidc.issuer-uri}
        registration:
          okta:
            client-id: ${oidc.client-id}
            client-secret: ${oidc.client-secret}
            scope: openid, email, profile
      resourceserver:
        jwt:
          issuer-uri: ${oidc.issuer-uri}
In the previous post, you locked down the backend with Spring Security and OIDC. Uncomment the Spring Security dependencies in your pom.xml.
<dependency>
    <groupId>org.springframework.boot</groupId>
    <artifactId>spring-boot-starter-security</artifactId>
</dependency>
<dependency>
    <groupId>org.springframework.security</groupId>
    <artifactId>spring-security-oauth2-client</artifactId>
</dependency>
<dependency>
    <groupId>org.springframework.security</groupId>
    <artifactId>spring-security-oauth2-resource-server</artifactId>
</dependency>
<dependency>
    <groupId>org.springframework.security</groupId>
    <artifactId>spring-security-oauth2-jose</artifactId>
</dependency>
To secure your front-end, you’ll need to install Okta’s React SDK, as well as react-router-dom. Using OktaDev Schematics greatly simplifies this process.
npm i @oktadev/schematics
npm i -g @angular-devkit/schematics-cli
schematics @oktadev/schematics:add-auth
When prompted, enter the same issuer and clientId you put into your application.yml.
The react-app/src/App.tsx file will be modified to add your Okta configuration and security-related React components.
import React, { Component } from 'react';
import { BrowserRouter as Router, Route } from 'react-router-dom';
import { Security, ImplicitCallback } from '@okta/okta-react';
import Home from './Home';

const config = {
  issuer: 'https://{yourOktaDomain}/oauth2/default',
  redirect_uri: window.location.origin + '/implicit/callback',
  client_id: '{clientId}'
};

export interface Auth {
  login(redirectUri: string): {};
  logout(redirectUri: string): {};
  isAuthenticated(): boolean;
  getAccessToken(): string;
}

class App extends React.Component {

  render() {
    return (
      <Router>
        <Security {...config}>
          <Route path="/" exact={true} component={Home}/>
          <Route path="/implicit/callback" component={ImplicitCallback}/>
        </Security>
      </Router>
    );
  }
}

export default App;
A Home component will be created in react-app/src/Home.tsx to serve as your landing page. Search for {/* Replace me with your root component. */} and replace it with <ProfileList auth={this.props.auth}/>.
react-app/src/Home.tsximport React, { Component } from 'react';
import { withAuth } from '@okta/okta-react';
import { Auth } from './App';
import './App.css';
import logo from './logo.svg';
import ProfileList from './ProfileList';
interface HomeProps {
auth: Auth;
}
interface HomeState {
authenticated: boolean;
}
export default withAuth(class Home extends Component<HomeProps, HomeState> {
constructor(props: HomeProps) {
super(props);
this.state = {authenticated: false};
this.checkAuthentication = this.checkAuthentication.bind(this);
this.login = this.login.bind(this);
this.logout = this.logout.bind(this);
}
async checkAuthentication() {
const authenticated = await this.props.auth.isAuthenticated();
if (authenticated !== this.state.authenticated) {
this.setState({authenticated});
}
}
async componentDidMount() {
await this.checkAuthentication();
}
async componentDidUpdate() {
await this.checkAuthentication();
}
async login() {
this.props.auth.login('/');
}
async logout() {
this.props.auth.logout('/');
}
render() {
const {authenticated} = this.state;
let body = null;
if (authenticated) {
body = (
<div className="Buttons">
<button onClick={this.logout}>Logout</button>
<ProfileList auth={this.props.auth}/> (1)
</div>
);
} else {
body = (
<div className="Buttons">
<button onClick={this.login}>Login</button>
</div>
);
}
return (
<div className="App">
<header className="App-header">
<img src={logo} className="App-logo" alt="logo"/>
<h1 className="App-title">Welcome to React</h1>
{body}
</header>
</div>
);
}
});| 1 | The ProfileList component will need to access props.auth to get an access token, so pass it in. |
You’ll need to update ProfileList.tsx to add auth to its required props (a.k.a., inputs) and to add an authorization header to server requests. While you’re at it, change from using port 3000 to using port 8080.
import React, { Component } from 'react';
import { Auth } from './App';

interface Profile {
  id: number;
  email: string;
}

interface ProfileListProps {
  auth: Auth;
}

interface ProfileListState {
  profiles: Array<Profile>;
  isLoading: boolean;
}

class ProfileList extends Component<ProfileListProps, ProfileListState> {

  constructor(props: ProfileListProps) {
    super(props);

    this.state = {
      profiles: [],
      isLoading: false
    };
  }

  async componentDidMount() {
    this.setState({isLoading: true});

    const response = await fetch('http://localhost:8080/profiles', {
      headers: {
        Authorization: 'Bearer ' + await this.props.auth.getAccessToken()
      }
    });
    const data = await response.json();
    this.setState({profiles: data, isLoading: false});
  }

 render() {
   const {profiles, isLoading} = this.state;

   if (isLoading) {
     return <p>Loading...</p>;
   }

   return (
     <div>
       <h2>Profile List</h2>
       {profiles.map((profile: Profile) =>
         <div key={profile.id}>
           {profile.email}<br/>
         </div>
       )}
     </div>
   );
 }
}

export default ProfileList;
If you try to make requests to the backend with its current configuration, it’ll fail because CORS hasn’t been enabled. Modify SecurityConfiguration.java class to enable CSRF (for improved security) and CORS.
package com.example.demo;

import org.springframework.context.annotation.Bean;
import org.springframework.security.config.annotation.method.configuration.EnableReactiveMethodSecurity;
import org.springframework.security.config.annotation.web.reactive.EnableWebFluxSecurity;
import org.springframework.security.config.web.server.ServerHttpSecurity;
import org.springframework.security.web.server.SecurityWebFilterChain;
import org.springframework.security.web.server.csrf.CookieServerCsrfTokenRepository;
import org.springframework.web.cors.CorsConfiguration;
import org.springframework.web.cors.reactive.CorsConfigurationSource;
import org.springframework.web.cors.reactive.UrlBasedCorsConfigurationSource;

import java.util.Collections;

@EnableWebFluxSecurity (1)
@EnableReactiveMethodSecurity (2)
public class SecurityConfiguration {

    @Bean (3)
    public SecurityWebFilterChain securityWebFilterChain(ServerHttpSecurity http) {
        // @formatter:off
        return http
            .csrf()
                .csrfTokenRepository(CookieServerCsrfTokenRepository.withHttpOnlyFalse()) (4)
                .and()
            .authorizeExchange()
                .pathMatchers("/ws/**").permitAll() (5)
                .anyExchange().authenticated()
                .and()
            .oauth2Login()
                .and()
            .oauth2ResourceServer()
                .jwt().and().and().build();
        // @formatter:on
    }

    @Bean (6)
    CorsConfigurationSource corsConfigurationSource() {
        CorsConfiguration configuration = new CorsConfiguration();
        configuration.setAllowCredentials(true);
        configuration.setAllowedOrigins(Collections.singletonList("http://localhost:3000"));
        configuration.setAllowedMethods(Collections.singletonList("GET"));
        configuration.setAllowedHeaders(Collections.singletonList("*"));
        UrlBasedCorsConfigurationSource source = new UrlBasedCorsConfigurationSource();
        source.registerCorsConfiguration("/**", configuration);
        return source;
    }
}| 1 | Use @EnableWebFluxSecurity when using Spring WebFlux and Spring Security. |
| 2 | Enable @PreAuthorize and other method-level security annotations. |
| 3 | Unlike Spring MVC, where you override a method, you create a SecurityWebFilterChain bean with WebFlux. |
| 4 | CSRF is enabled in this app, but we don’t enable sending the CSRF header back because we’re not manipulating data. If you want to POST, PUT, or DELETE, you will need to grab the XSRF-TOKEN cookie’s value and send it back as a X-XSRF-TOKEN header. |
| 5 | WebSockets can’t be secured. There are WebSocket libraries (e.g., Socket.IO) that allow sending an authorization header, but Spring WebFlux doesn’t support them. |
| 6 | Define a CorsConfigurationSource bean and CORS will be enabled for your API. |
Restart and you should be able to log in and view data from your React app!
You might ask if you can deploy your React and Spring WebFlux app as a single artifact. Yes, this is possible, and you can see how to do it with the frontend-maven-plugin in Use React and Spring Boot to Build a Simple CRUD App. In this example, they’re separate apps because this is what most of my followers seem to prefer.
I write a lot of Java API + JavaScript App tutorials. If you've read them, thanks!
— Matt Raible (@mraible) August 22, 2018
I'm curious to know which deployment model you prefer. Results may influence future tutorials/talks. 😉
Do you prefer:
Secure Real-time Communication with React, Spring WebFlux, and WebSockets
Adding an authorization header to any fetch() requests will work for the interval and RxJS examples I showed. Ideally, it’d work for an EventSource and WebSockets too.
Unfortunately, neither of the raw EventSource or WebSocket APIs have support for passing additional headers. For EventSource, I found Yaffle/EventSource which is supposed to support additional headers. I also found a fork of it, AlexGalays/EventSource, that has TypeScript support and better support. Unfortunately, I was unable to get either library to work.
You might notice my comment above that you can’t secure WebSockets. What I meant to say is they can’t be secured when using WebFlux. When I tried to use socket.io and it’s socket.io-client, I ran into an "Invalid 'Upgrade' header:" error. Shortly after, I found a Stack Overflow Q & A, asking about support for Socket.IO and SockJS.
The Spring Framework team is not considering this feature right now in WebFlux. Because of the back-pressure support in reactive streams, the team is considering protocols that would leverage that information.
For example, rsocket support would fit that space and much more. See SPR-16751.
I tried rsocket-js, but quickly realized Spring WebFlux was lacking the support I needed. Duh! SPR-16751 is still open.
Josh and I put our heads together and decided the best workaround would be to modify the WebSocket endpoint so it only sends IDs. That way, no sensitive data is propagated. To do this, you’ll need to modify WebSocketConfiguration.java to just send the ID, not the whole Profile.
Flux<WebSocketMessage> messageFlux = publish.map(evt -> {
    try {
        Profile profile = (Profile) evt.getSource(); (1)
        Map<String, String> data = new HashMap<>(); (2)
        data.put("id", profile.getId());
        return objectMapper.writeValueAsString(data); (3)
    } catch (JsonProcessingException e) {
        throw new RuntimeException(e);
    }
}).map(str -> {
    log.info("sending " + str);
    return session.textMessage(str);
});

return session.send(messageFlux);| 1 | Get the profile from the event. |
| 2 | Create a map and stuff the id into it. |
| 3 | Return the map as JSON. |
You could use a similar technique with server-sent events in the ServerSentEventController. The advantage of using WebSocket over EventSource is EventSource is read-only. WebSocket connections can both send data to the browser and receive data from the browser.
|
Then you can modify the code in ProfileList.tsx to fetch the profile securely.
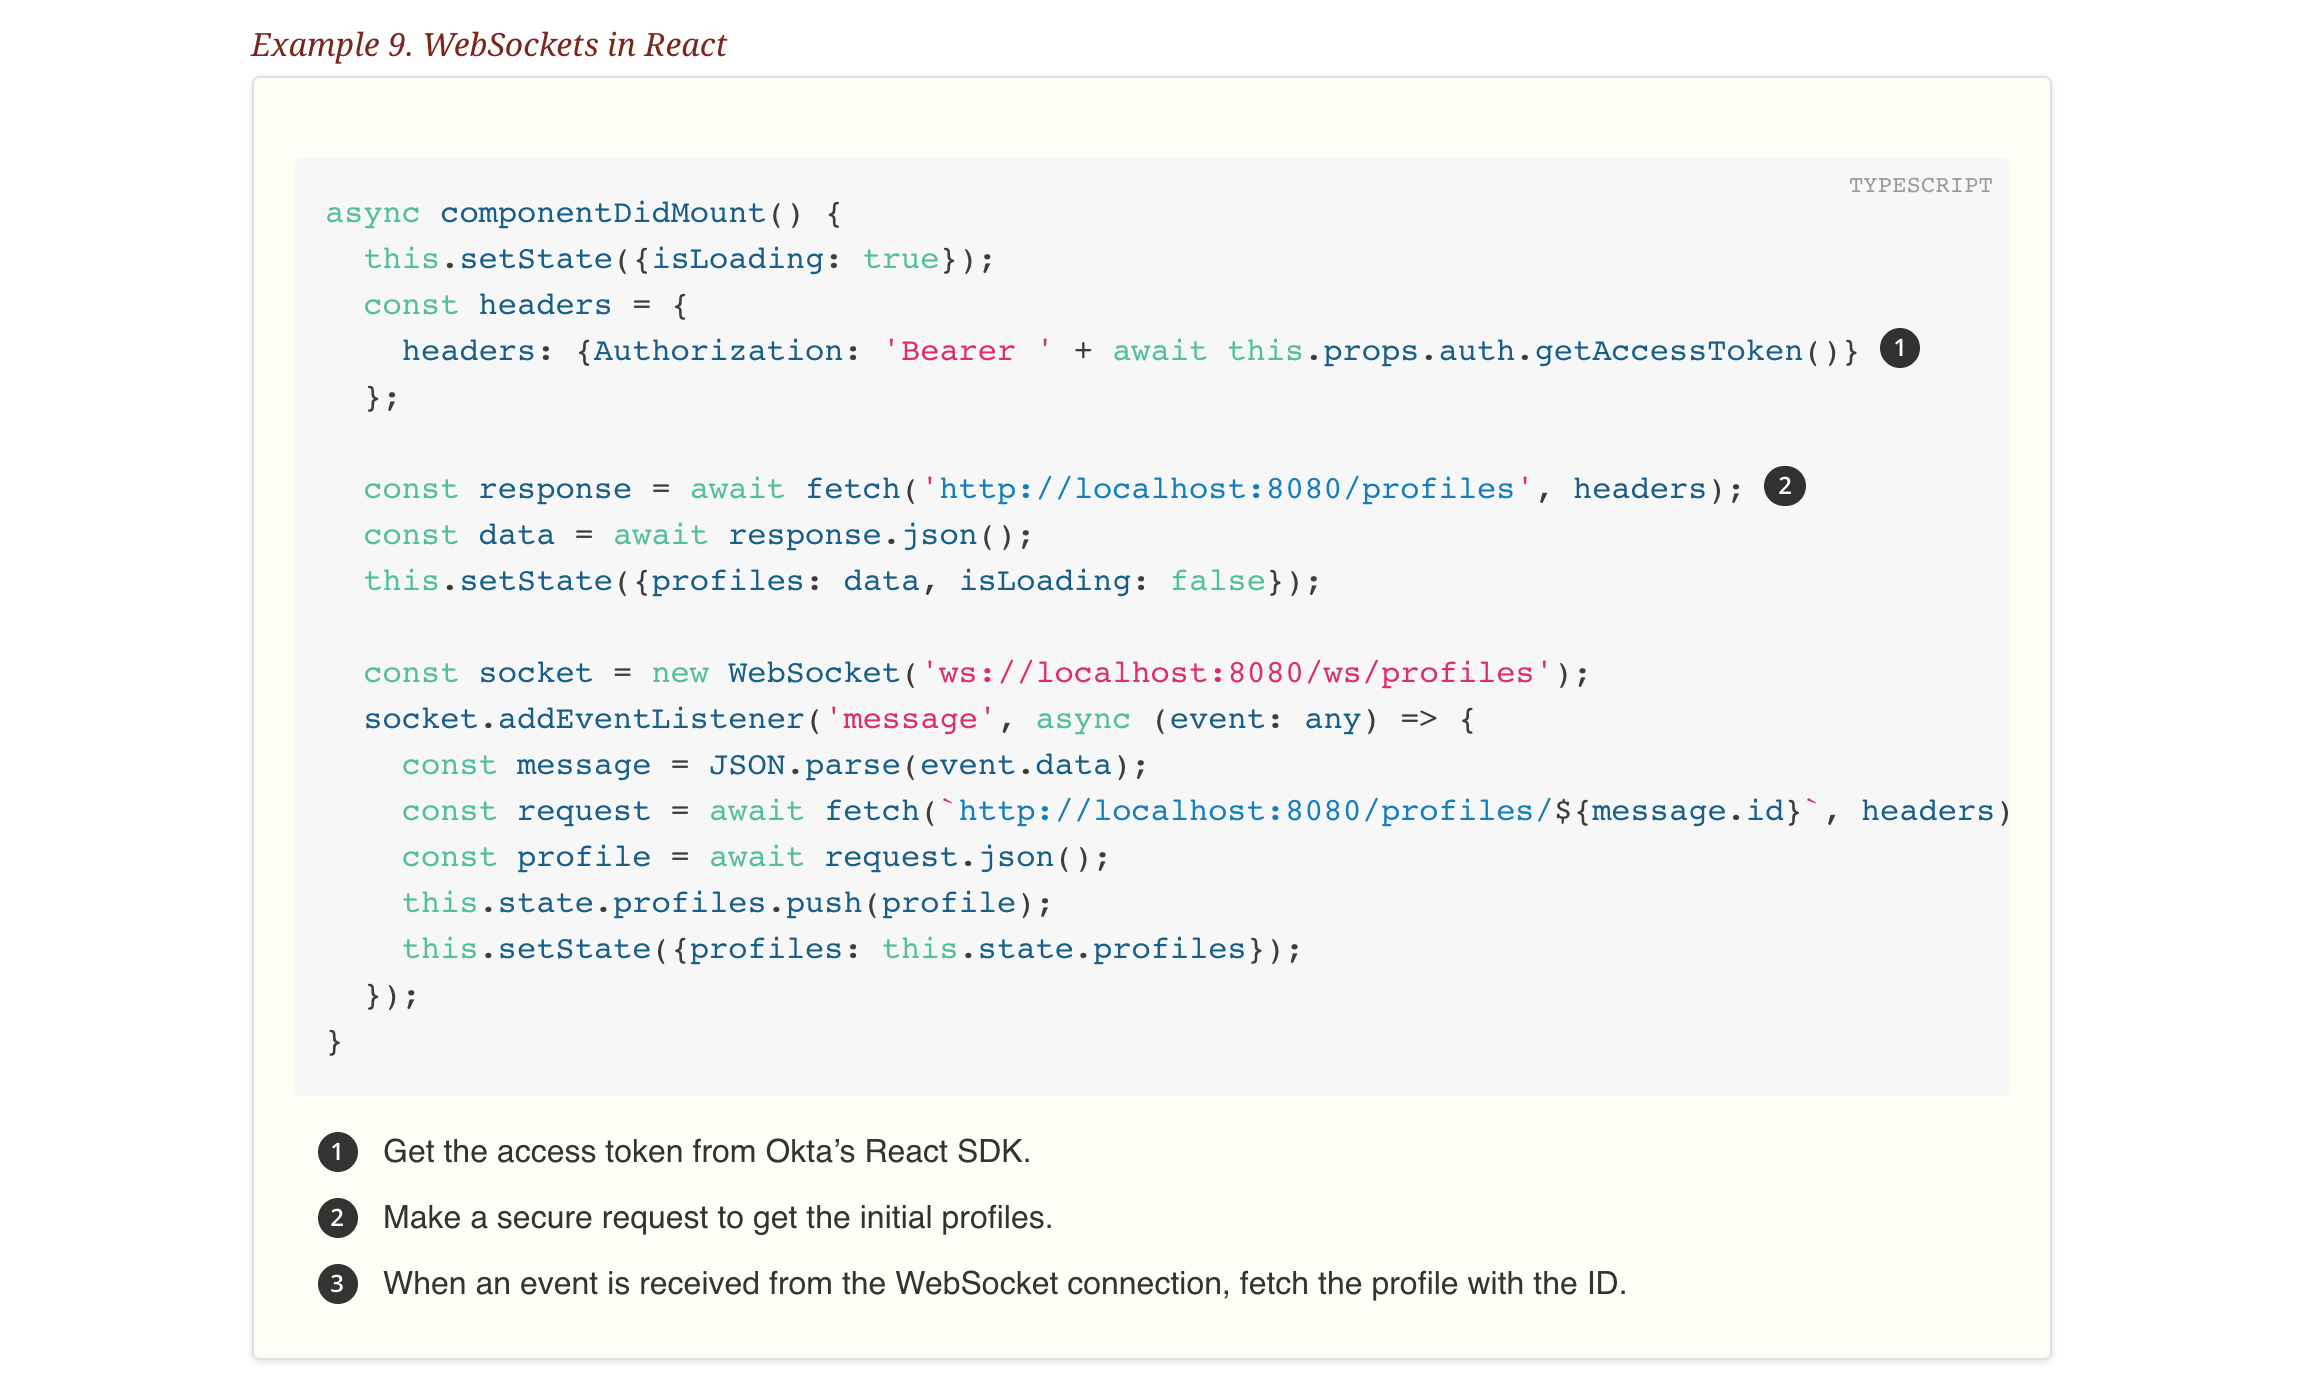
async componentDidMount() {
  this.setState({isLoading: true});
  const headers = {
    headers: {Authorization: 'Bearer ' + await this.props.auth.getAccessToken()} (1)
  };

  const response = await fetch('http://localhost:8080/profiles', headers); (2)
  const data = await response.json();
  this.setState({profiles: data, isLoading: false});

  const socket = new WebSocket('ws://localhost:8080/ws/profiles');
  socket.addEventListener('message', async (event: any) => {
    const message = JSON.parse(event.data);
    const request = await fetch(`http://localhost:8080/profiles/${message.id}`, headers); (3)
    const profile = await request.json();
    this.state.profiles.push(profile);
    this.setState({profiles: this.state.profiles});
  });
}| 1 | Get the access token from Okta’s React SDK. |
| 2 | Make a secure request to get the initial profiles. |
| 3 | When an event is received from the WebSocket connection, fetch the profile with the ID. |
After making these changes, you should have an app that gets real-time updates from Spring WebFlux when new profiles are added.
You can prove this works by creating an access token using OpenID Connect <debugger/>. To use this, I had to add https://oidcdebugger.com/debug as a login redirect URI, and manually enter a state variable. Then I was able to modify create-stream.sh to use the access token when creating profiles.
#!/bin/bash
port=${1:-8080}
count=0
accessToken=<your access token>

profile () {
  ((count++))
  echo "posting #${count}"
  http POST http://localhost:${port}/profiles email="random${count}" "Authorization: Bearer ${accessToken}"
  if [ $count -gt 120 ]
  then
    echo "count is $count, ending..."
    break
  fi
}

while sleep 1; do profile; done
Congrats, you’ve now gone full-stack reactive!
Learn More about Spring WebFlux, WebSockets, Reactive Programming, and React
I hope you’ve enjoyed this whirlwind tour of techniques for building reactive APIs and communicating with them from React. I realize there’s a lot more (e.g., React’s "Flux" architecture and Redux), but I figured this post was already long enough.
You can find the source code used in this post on GitHub. You can clone it and check out the react-app branch:
git clone -b react-app https://github.com/oktadeveloper/okta-spring-webflux-react-example.git
I also created a screencast of all the code created in this series. Bonus: I used Java 11 and Node 11 while creating it.
To learn more about Spring WebFlux, Reactive Programming, and React, I invite you to check out some of our other blog posts.
If you have any questions, please leave a comment below, ask us on Twitter (@starbuxman and @mraible), or post a question on Stack Overflow. If you tag your question with "okta" and "webflux", there’s a good chance we’ll see them!
Changelog:
- May 28, 2019: Updated to use Spring Boot 2.1.5 and React 16.8.6. You can see the example app changes in okta-spring-webflux-react-example#15; changes to this post can be viewed in okta.github.io#2898.
- Nov 5, 2018: Updated to use the Spring Boot 2.1 GA release and Create React App 2.1.0. You can see the example app changes in okta-spring-webflux-react-example#6; changes to this post can be viewed in okta.github.io#2459.
Matt Raible is a well-known figure in the Java community and has been building web applications for most of his adult life. For over 20 years, he has helped developers learn and adopt open source frameworks and use them effectively. He's a web developer, Java Champion, and Developer Advocate at Okta. Matt has been a speaker at many conferences worldwide, including Devnexus, Devoxx Belgium, Devoxx France, Jfokus, and JavaOne. He is the author of The Angular Mini-Book, The JHipster Mini-Book, Spring Live, and contributed to Pro JSP. He is a frequent contributor to open source and a member of the JHipster development team. You can find him online @mraible and raibledesigns.com.
Okta Developer Blog Comment Policy
We welcome relevant and respectful comments. Off-topic comments may be removed.