Secure a Node API with OAuth 2.0 Client Credentials
Securing server-to-server API services can be tricky. OAuth 2.0 is an excellent way to offload user authentication to another service, but what if there is no user to authenticate? In this article, I’ll show you how you can use OAuth 2.0 outside the context of a user, in what is also known as the Client Credentials Flow.
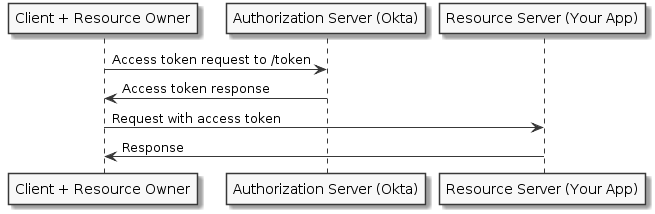
Instead of storing and managing API keys for your clients (other servers), you can use a third-party service to manage authorization for you. The way this works is that an API client sends a request to an OAuth server asking for an API token. That token is then sent from the API client to your API service along with their request. Once you have the client’s token, you can verify its validity without needing to store any information about the client.
How the Client Credentials Flow Verification Works
One way to verify tokens you receive to your API service is to forward the token to the OAuth server to ask if it is valid. The downside to this method is each API request sent to your server requires a request sent to the OAuth server as well, which increases the time it takes for you to respond to your client. An alternative is to use something called local validation, a strategy popularized by JSON Web Tokens (JWT). A JWT contains your claims (client data) in unencrypted, machine-readable JSON.
When using the local validation pattern to validate an API token (JWT), you can use math to validate that:
The token your API is receiving hasn’t been tampered with The token your API is receiving hasn’t expired That certain pieces of JSON data encoded in the token are what you expect them to be
How is that secure? you might be wondering. JWTs contain three parts: a header, a payload, and a signature. The header and payload are simple base64 encoded strings, which can easily be decrypted and read. The signature uses an algorithm listed in the header, along with a private key, to create a hash of the header and payload. The hash can’t be recreated without the private key, but it can be verified with a public key.
In a way, this is like a driver’s license or a passport. It’s quite difficult to forge, but it’s very easy for somebody to look at it and see your name, date of birth, and other information. You can scan the barcode, test it with a black light, or look for watermarks to help verify its validity.
While similar in concept, a valid JWT would actually be far more difficult to forge. Someone with enough skill can create a convincing driver’s license, but without the private key it could take a modern computer years to brute force a valid JWT signature. Tokens should also have an expiration. While configurable, a solid default is one hour. This means a client would need to request a new token every 60 minutes if it needs to make a new request to your API server. This is an extra layer of security in case your token is compromised. Who knows? Maybe there’s a quantum computer out there that can recreate the signature within a couple hours.
Now that you understand the basics of the OAuth 2.0 client credentials flow works, let’s build a Node API that uses Client Credentials and Okta.
What is Okta?
In short, we make identity management easier, more secure, and more scalable than what you’re used to. Okta is an API service that allows you to create, edit, and securely store user accounts and user account data, and connect them with one or more applications. Our API enables you to:
- Authenticate and authorize your users
- Store data about your users
- Perform password-based and social login
- Secure your application with multi-factor authentication
- And much more! Check out our product documentation for more information
Register for a forever-free developer account, and when you’re done, come back to learn more about building secure APIs in Node!
Create a Basic Node API
In order to get started, I’ll show you how to create a basic API in Node. Node keeps a list of dependencies along with other metadata in a file called package.json.
Assuming you have Node installed already, create a new folder for your API server. You can then use npm to generate a package.json for you. The command npm init will prompt you for some information, but you can just keep hitting Enter to stick to the defaults.
$ mkdir client-credentials-flow
$ cd client-credentials-flow
$ git init
$ npm init
The quickest way to get an API server up and running in Node is by using Express. You can add Express as a dependency with the command npm install express@4.16.3 --save. This creates a folder called node_modules where express and anything it depends on are downloaded, and your app can then use those. To make development go faster, you can also add a dev dependency called nodemon, which will restart your server whenever you make code changes. To add a dev-dependency, use the -D flag: npm install -D nodemon@1.17.5.
When building Node apps, you usually want to ignore storing the node_modules folder in your git repo. You can do that by adding node_modules to your .gitignore file.
echo node_modules >> .gitignore
Package managers will also include a file (e.g. package-lock.json or yarn.lock) so that when you download the node_modules on another machine (with npm install or yarn), the same version gets downloaded. This helps prevent any inconsistencies between servers, and keeps you from wondering why something works on your machine, but not in production. Make sure to commit that file to your git repo as well:
$ git add .
$ git commit -m "Adding package files."
You can also add scripts to your package.json folder to run these commands. Create a start script with the command node . (the . tells it to run the script listed in your package.json as main, which by default is index.js. You’ll also want to create a dev script with the command nodemon *.js node .. Command line dependencies, like nodemon, are in the path when running inside a node script. You can now run these commands with npm start or npm run dev. Your package.json file should now look something like this:
package.json
{
  "name": "client-credentials-flow",
  "version": "1.0.0",
  "description": "",
  "main": "index.js",
  "scripts": {
    "dev": "nodemon *.js node .",
    "start": "node .",
    "test": "echo \"Error: no test specified\" && exit 1"
  },
  "author": "",
  "license": "ISC",
  "dependencies": {
    "express": "^4.16.3"
  },
  "devDependencies": {
    "nodemon": "^1.17.5"
  }
}
Now for the most basic “Hello World” express app:
index.js
const express = require('express')
const app = express()

app.get('/', (req, res) => res.send('Hello World!'))

const port = process.env.PORT || 3000
app.listen(port, () => console.log(`Listening on port ${port}`))
That’s it! To start it, type npm run dev in a terminal window. You can leave this running while we make changes, and it will automatically restart to reflect new changes. Now go to http://localhost:3000 in your browser (or on the command line with curl http://localhost:3000) and you should see Hello World! echoed back.
Register with an OAuth 2.0 Provider for Your Node API
Now to secure the app. This is where you need to set up an OAuth 2.0 service. Okta is a cloud-based service that allows developers to easily and securely store OAuth 2.0 tokens, user accounts, and user data, then connect them with one or multiple applications. Okta also provides libraries for many languages, including Node, to make their API very easy for a developer to integrate into a huge variety of apps.
You can use Okta to quickly and easily set up server-to-server authentication. If you don’t already have an account, sign up for a free Okta Developer account. Once you register, you’ll be given a unique Okta Org URL (e.g. https://{yourOktaDomain}) and an email to activate your new account.
You’ll need two parts in order to make client-to-server authentication work: an authorization server, and a test client/application.
Create an Authorization Server
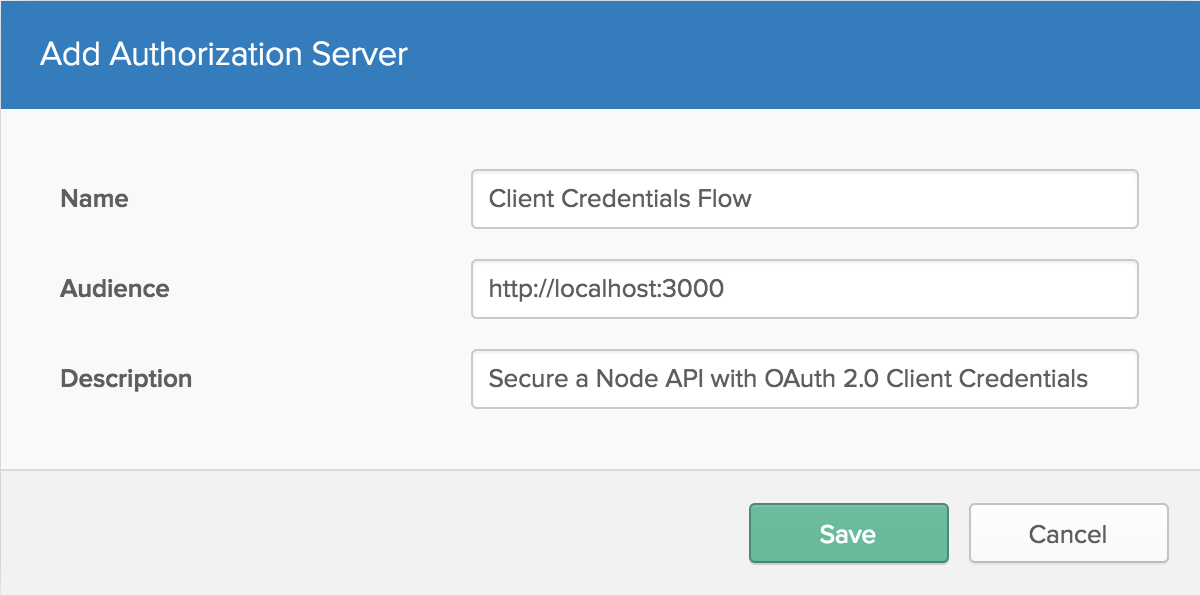
The authorization server is where clients can request a token to use on your API server. Inside the Okta dashboard, click on the API tab in the header, then select the Authorization Servers tab. Click Add Authorization Server, then give your server a useful name and description. The Audience should be an absolute path for the server that will be consuming the tokens.
Once you create the authorization server, you will need a scope for your clients to access. Click the Scopes tab and add a scope. You can have many of these, which can help define what parts of the API are being used, or even who is using it.

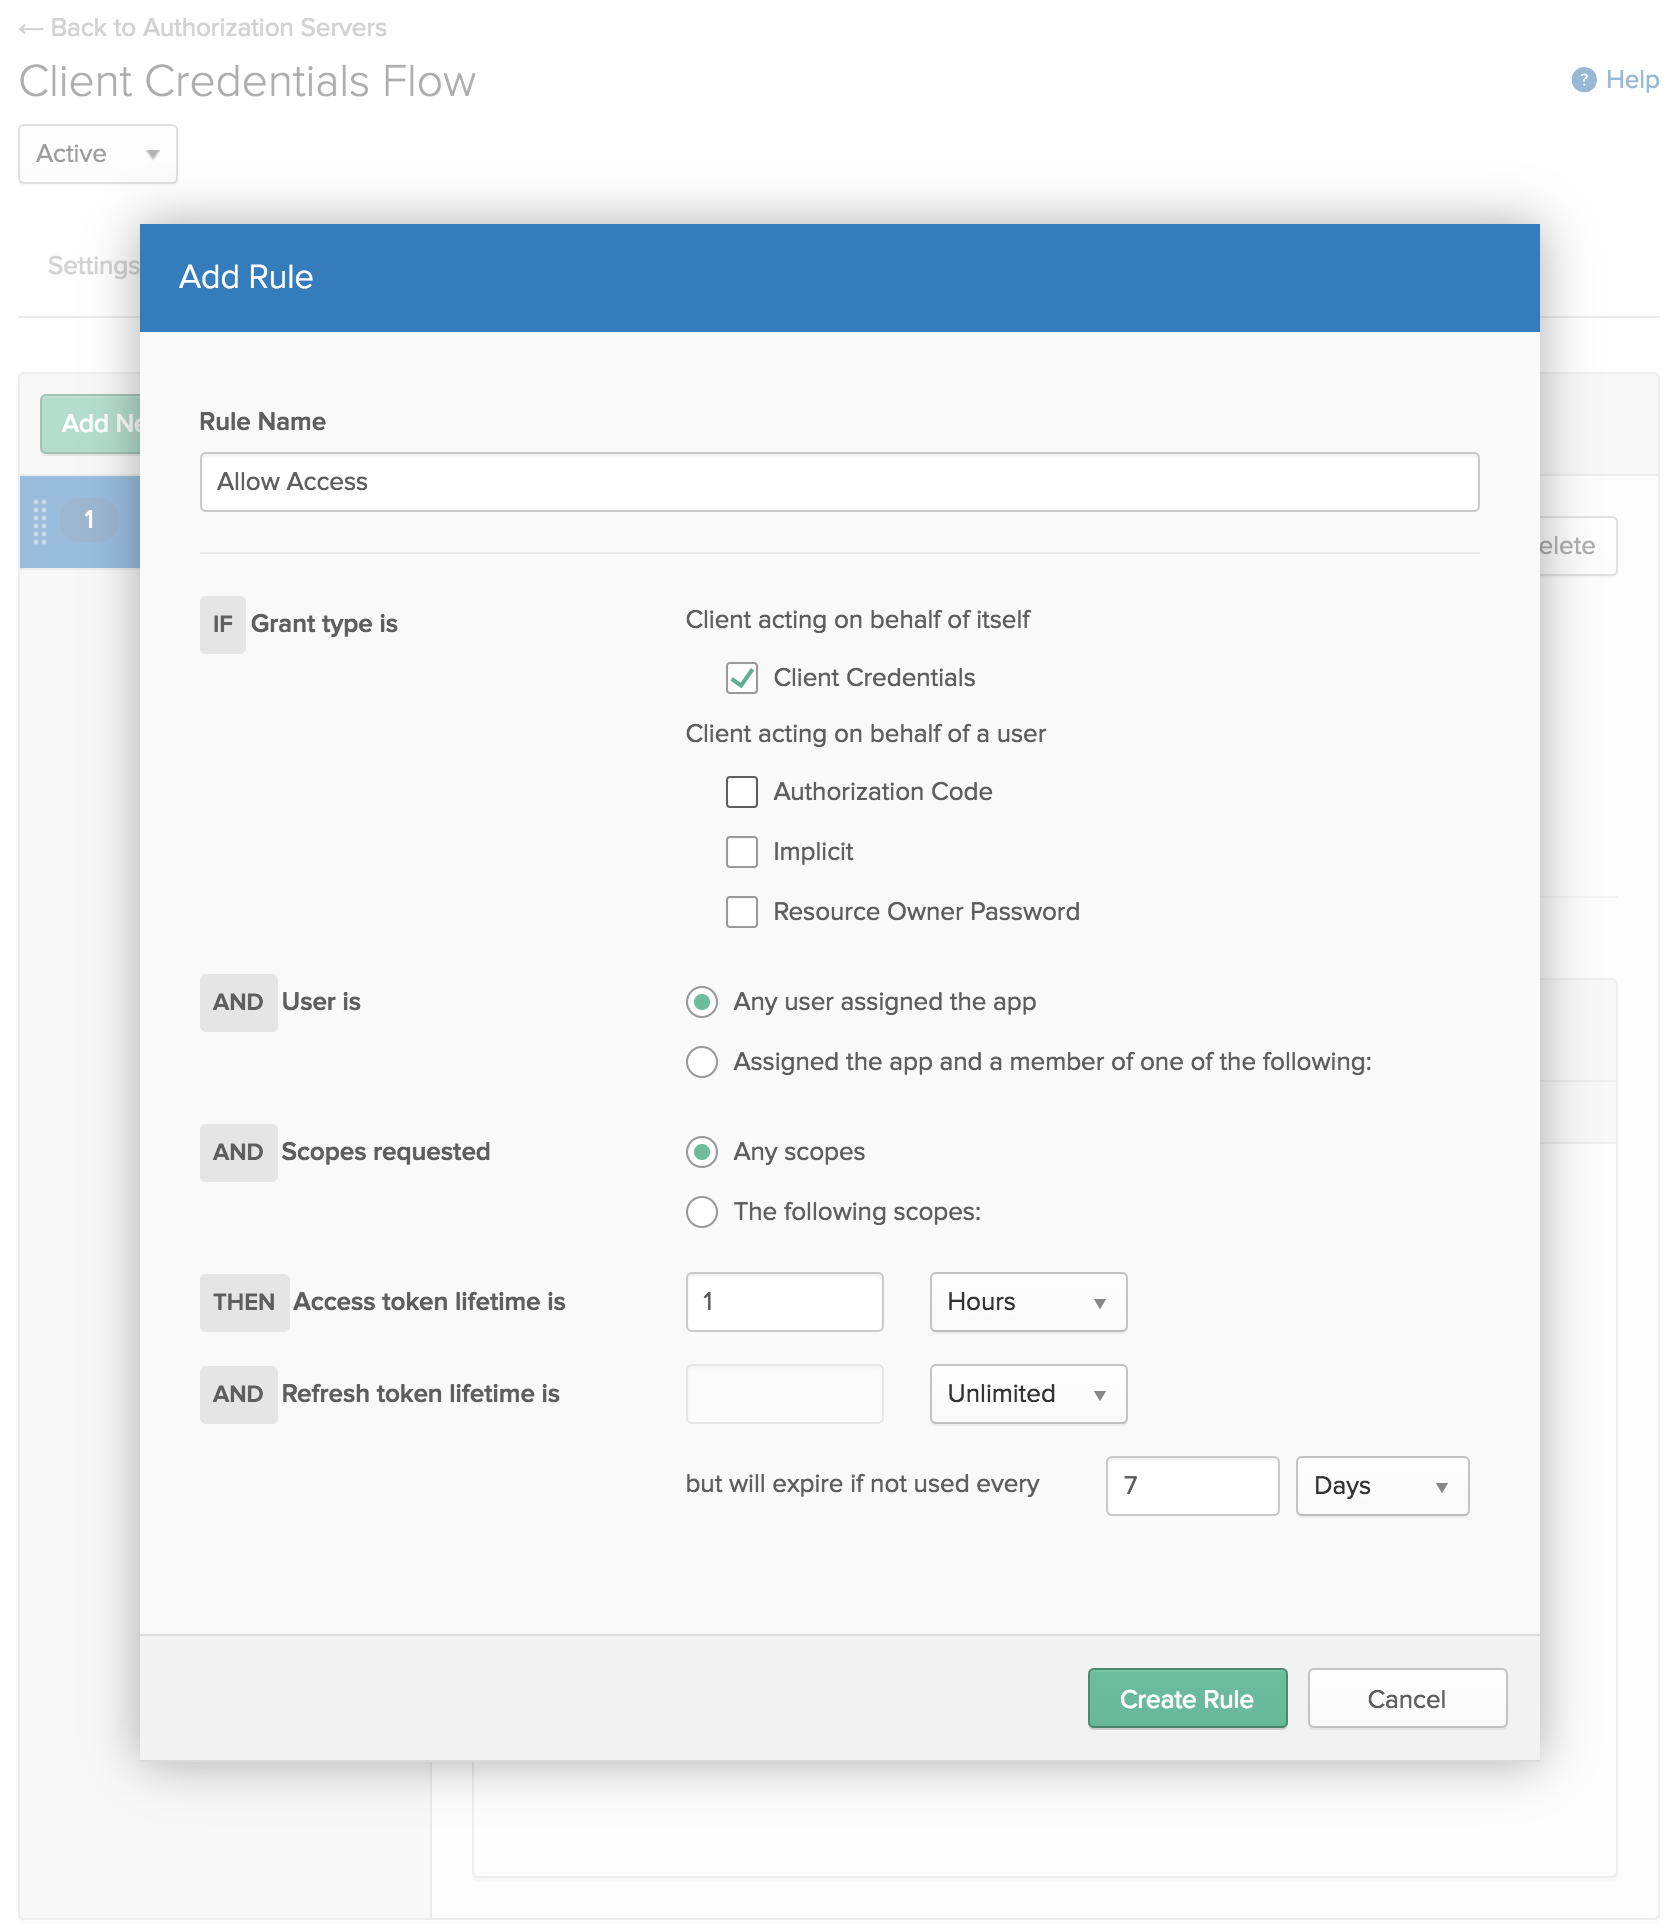
Now that you have a scope, you also need to specify some rules to say who has access to it. Click the Access Policies tab and create a new policy. For now, just allow access to All clients. Then click Add Rule and give it a name. Since this is only for client credentials, remove the other grant types for acting on behalf of a user (Authorization Code, Implicit, and Resource Owner Password) so the only grant type is Client Credentials. Aside from that, just use the default settings for now.
Back on the Settings tab, take note of the Issuer. This is the address clients will use to request a token, and what your API server will use to verify that those tokens are valid.
Create a Test Client
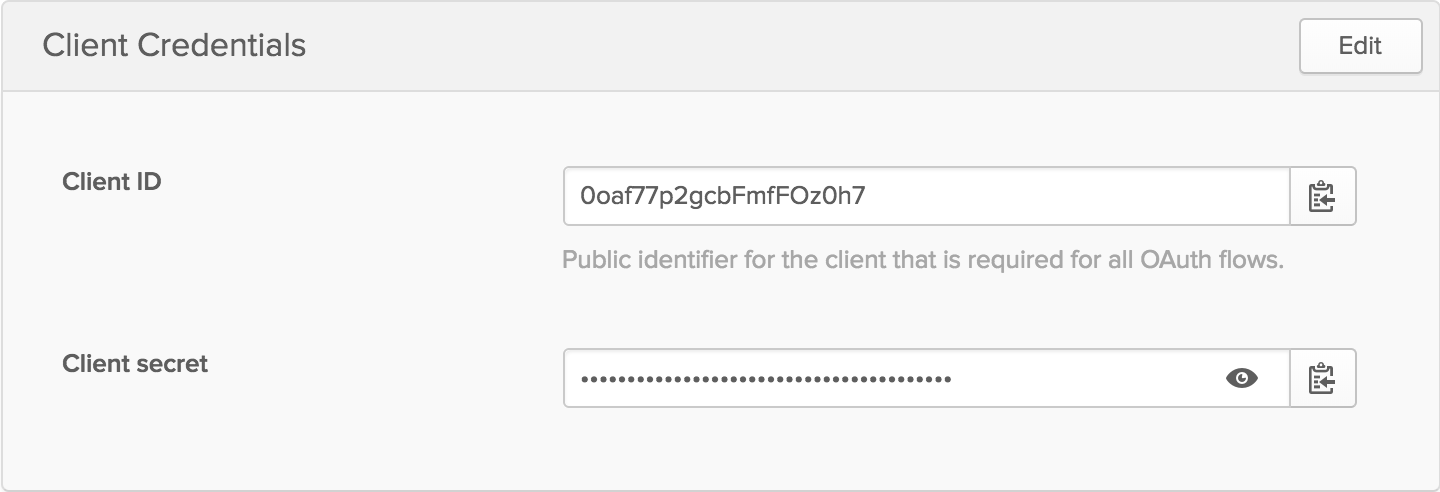
In your Okta dashboard, click on Applications in the top header. Applications are also known as clients, so this is where you can create a test client. Click Add Application and choose Service (Machine-to-Machine). The only information it needs is a name, so you can use something like Test Client. This will give you the credentials for your client (in this testing case, that would be you).
Secure your Node API
You now have all the pieces of the puzzle to make it so only authenticated users get the beloved “Hello World” welcome message, and everybody else gets an error.
Safely Store Your Credentials
You’ll want to store your credentials safely. One way of doing this is to keep a file locally that isn’t stored in git (especially useful if your code is open source, but still a good thing to do regardless). This also lets you use the same code for multiple applications (e.g. dev and production environments).
Go ahead and create a .env file containing the issuer from your authorization server and the client credentials from your test application. Make sure to add it to your .gitignore file so it doesn’t get added to your git repo: echo .env >> .gitignore. Your .env file should look something like this:
.env
ISSUER=https://{yourOktaDomain}/oauth2/abcdefg1234567
DEFAULT_SCOPE=such_scope
TEST_CLIENT_ID=client-id
TEST_CLIENT_SECRET=client-secret
A quick way for your code to read the .env file is with a library called dotenv. You can install it with npm install dotenv. Then add require('dotenv').config() to the first line of index.js. You want it to be the first thing that runs so that the rest of your code has access to those environment variables.
Verify Client Requests
Okta provides a Node library to help verify JSON Web Tokens. When it first sees a request to verify a token, it will fetch the public keys Okta via your authorization server. It will then hold on to those keys for an hour by default, though this is configurable. If a token comes in that can’t be verified, it will check with Okta to see if there are new keys to use. If it still can’t verify it, the library will throw an error. You can install the package with npm install @okta/jwt-verifier@0.0.12.
You need to provide the package with the JWT. It’s up to you to tell your clients how to provide the token, which can be done in a number of ways. Common practice is to use the Authorization header in an HTTP(s) request that typically looks like Bearer MG9h...NhOq==. Modify your / endpoint to look for the token and verify it with Okta.
index.js
const OktaJwtVerifier = require('@okta/jwt-verifier')
const oktaJwtVerifier = new OktaJwtVerifier({
  issuer: process.env.ISSUER,
})

app.get('/', async (req, res) => {
  try {
    const { authorization } = req.headers
    if (!authorization) throw new Error('You must send an Authorization header')

    const [authType, token] = authorization.split(' ')
    if (authType !== 'Bearer') throw new Error('Expected a Bearer token')

    await oktaJwtVerifier.verifyAccessToken(token)
    res.json('Hello World!')
  } catch (error) {
    res.json({ error: error.message })
  }
})
Try going to http://localhost:3000 again. This time you’ll get an error message since you’re not authenticated.
If you’re not familiar with the relatively new async/await syntax, this might look a little strange to you. What’s happening here is the function is labeled as async, so it will always return a Promise. When it sees the await keyword, the rest of the function will pause until the response comes back. In the meantime, the main thread is freed up for other JavaScript code to execute.
In this example, verifyAccessToken sends a request to Okta if it can’t immediately verify the token. If you had a setInterval somewhere else in the code, that code could still execute while waiting for Okta’s response.
When verifyAccessToken completes, it’ll throw an error if the token is invalid. Therefore, if it gets past that line without throwing an error, it’s safe to assume the client is verified, and you can send the “Hello World” message. If you wanted more information about the client, you could get the response from the verifier with const jwt = await oktaJwtVerifier.verifyAccessToken(token).
Test your Secure API
You now can see that you get an error in the browser without proper authentication, but I haven’t shown you that you can still properly verify yourself. In order to get a token from the authorization server, you can write a simple Node script. Native Node requests are a bit tedious to work with, so you can use the request-promise library, which will allow you to continue using promises and the nice async/await syntax. You will also need btoa, which converts a string into base64.
npm install request-promise@4.2.2 btoa@1.2.1
test.js
require('dotenv').config()
const request = require('request-promise')
const btoa = require('btoa')
const { ISSUER, TEST_CLIENT_ID, TEST_CLIENT_SECRET, DEFAULT_SCOPE } = process.env

const test = async () => {
  const token = btoa(`${TEST_CLIENT_ID}:${TEST_CLIENT_SECRET}`)
  try {
    const { token_type, access_token } = await request({
      uri: `${ISSUER}/v1/token`,
      json: true,
      method: 'POST',
      headers: {
        authorization: `Basic ${token}`,
      },
      form: {
        grant_type: 'client_credentials',
        scope: DEFAULT_SCOPE,
      },
    })

    const response = await request({
      uri: 'http://localhost:3000',
      json: true,
      headers: {
        authorization: [token_type, access_token].join(' '),
      },
    })

    console.log(response)
  } catch (error) {
    console.log(`Error: ${error.message}`)
  }
}

test()
Now, with your app still running on port 3000, run the test with node test.js. This will send a request to Okta to get a token, then forward that token to your API server and print the results. You should get a nice “Hello World” greeting!
Register Clients on the Fly
You have a test client, but in the real world, you might want to let people sign up for your API without making you log into Okta and manually create a Client for them. You also probably wouldn’t want everybody to share the same client id and secret, so that you can keep track of who is making what requests, how often, for example.
Okta provides an API that allows you to automate all sorts of tasks. One of those is creating new applications. Okta also has a Node library to make it really simple. For your app to authenticate with Okta, you need an API token. Log in to your dashboard, then select Tokens from the API dropdown in the header. Click Create Token and give it a meaningful name. It will then give you a token this one time - if you lose it you’ll need to create another one. Go ahead and add this to your .env file as TOKEN.
Install the Okta Node SDK with npm install @okta/okta-sdk-nodejs@1.1.0. It requires your Organization URL, so you should add that to your .env file also. Then create a new route in index.js for registering new clients.
index.js
const okta = require('@okta/okta-sdk-nodejs')
const oktaClient = new okta.Client({
  orgUrl: process.env.ORG_URL,
  token: process.env.TOKEN,
})

app.get('/register/:label', async (req, res) => {
  try {
    const application = await oktaClient.createApplication({
      name: 'oidc_client',
      label: req.params.label,
      signOnMode: 'OPENID_CONNECT',
      credentials: {
        oauthClient: {},
      },
      settings: {
        oauthClient: {
          grant_types: ['client_credentials'],
          application_type: 'service',
        },
      },
    })

    const { client_id, client_secret } = application.credentials.oauthClient

    res.json({
      client_id,
      client_secret,
      request_token_url: `${process.env.ISSUER}/v1/token`,
    })
  } catch (error) {
    res.json({ error: error.message })
  }
})
You can now go to http://localhost:3000/register/Awesome+App+Name (in your browser is fine) to create a new client. The first time you go there, it should give you a client id and secret, and remind you where to request a token. You can replace the client id and secret from before with this new one in .env and re-run test.js to see that this client also works now.
If you sign back into your Okta Developer Console, you’ll see that “Awesome App Name” has been added as an Application.
Keep in mind, This is a test… This is only a test. You likely do not want to allow anybody to openly register for an API key without any kind of verification. This might be a good place to implement some sort of CAPTCHA or require user authentication to get the API key. Once they have the API key, they could then use that in their application without further user authentication.
Learn More About Node and OAuth 2.0 Client Credentials with Okta
I hope I’ve shown you that it can be really easy to give your Node APIs an excellent level of security. Okta has a lot more to offer in regards to securing your applications. If you’d like to read more about Node, Okta, and OAuth 2.0 Client Credentials, please check out some of these other resources or browse the rest of the Okta developer blog:
- Okta Node SDK
- Implementing the Client Credentials Flow
- Validating Access Tokens
- Secure Server-to-Server Communication with Spring Boot and OAuth 2.0
- How to Secure Your .NET Web API with Token Authentication
As always, you can hit us up in the comments below with feedback or questions, or on Twitter @oktadev. We look forward to hearing from you!
Okta Developer Blog Comment Policy
We welcome relevant and respectful comments. Off-topic comments may be removed.