Build a CRUD App with ASP.NET Core and Angular

A lot of applications today are built with an API on the backend, and then a single page application on the front end. This is a good approach because it allows you a ton of flexibility. For example, if you get a requirement to build a native mobile client later on: it’s easy, you already have the server side in place.
Today you’ll use ASP.NET Core 2.0 on the server side, and Angular 5 on the client side to build a basic CRUD app to track workouts, specifically jogging! You will create a Backend folder for the ASP.NET Core 2.0 project, and a Frontend folder for the Angular part of the project.
Create a REST API in ASP.NET Core 2.0
Let’s start by building the back end first. For my IDE I am using Visual Studio 2017, so all the screenshots will be from there. If you’re using something else, you should be able to easily find similar options.
Start with File > New Project, and choose ASP.NET Core Web Application. Choose .NET Core, version 2.0 and the Web API template.
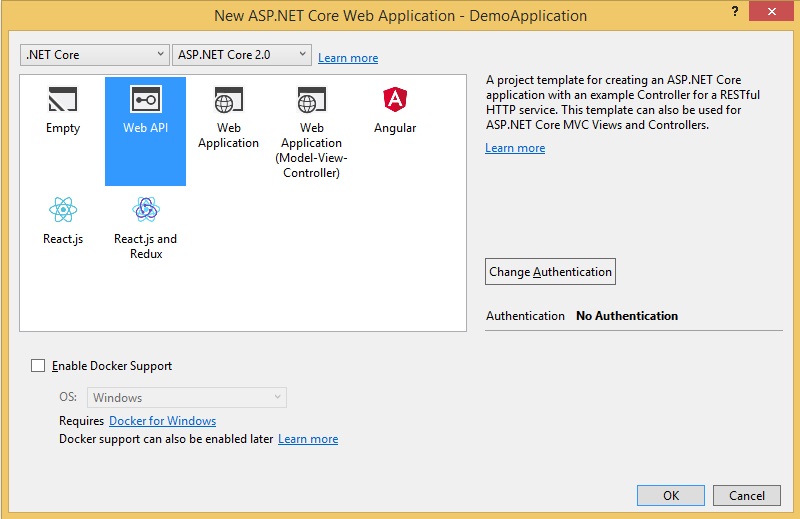
Pick “No authentication”. You’ll add authentication later.
Build a Model for Your ASP.NET Core App
Let’s build some data. Your application will store data about your workouts, specifically the date of the workout, the distance covered, and the time it took (in seconds).
So, create a folder called Models, and in there build a Workout class in a file called Workout.cs:
public class Workout
 {
     public int Id { get; set; }

     public DateTimeOffset Date { get; set; }

     public int DistanceInMeters { get; set; }

     public long TimeInSeconds { get; set; }
 }
Add a New Controller
Next, let’s add a controller. Right click the “Controllers” folder, choose “Add” and “Controller”. Visual Studio will offer the option to add an API Controller with actions using Entity Framework Core - choose that. Pick the model (the Workout class), and set the controller name to WorkoutsController. For the database context, click + for a new one and call it WorkoutContext.
Check the Database Context
A Data folder has been created, and in it a file called WorkoutContext.cs. It’s contents are:
public class WorkoutContext : DbContext
    {
        public WorkoutContext (DbContextOptions<WorkoutContext> options)
            : base(options)
        {
        }

        public DbSet<Backend.Models.Workout> Workout { get; set; }
    }
It has created a database context, and added a database set of type Workout to the context. This database context provides a way for your C# code to access your database.
Add a Workout Controller
In the Controllers folder Visual Studio has created a WorkoutController.cs with the following code:
namespace Backend.Controllers
{
    [Produces("application/json")]
    [Route("api/Workouts")]
    public class WorkoutsController : Controller
    {
        private readonly WorkoutContext _context;

        public WorkoutsController(WorkoutContext context)
        {
            _context = context;
        }

        // GET: api/Workouts
        [HttpGet]
        public IEnumerable<Workout> GetWorkout()
        {
            return _context.Workout;
        }

        // GET: api/Workouts/5
        [HttpGet("{id}")]
        public async Task<IActionResult> GetWorkout([FromRoute] int id)
        {
            if (!ModelState.IsValid)
            {
                return BadRequest(ModelState);
            }

            var workout = await _context.Workout.SingleOrDefaultAsync(m => m.Id == id);

            if (workout == null)
            {
                return NotFound();
            }

            return Ok(workout);
        }

        // PUT: api/Workouts/5
        [HttpPut("{id}")]
        public async Task<IActionResult> PutWorkout([FromRoute] int id, [FromBody] Workout workout)
        {
            if (!ModelState.IsValid)
            {
                return BadRequest(ModelState);
            }

            if (id != workout.Id)
            {
                return BadRequest();
            }

            _context.Entry(workout).State = EntityState.Modified;

            try
            {
                await _context.SaveChangesAsync();
            }
            catch (DbUpdateConcurrencyException)
            {
                if (!WorkoutExists(id))
                {
                    return NotFound();
                }
                else
                {
                    throw;
                }
            }

            return NoContent();
        }

        // POST: api/Workouts
        [HttpPost]
        public async Task<IActionResult> PostWorkout([FromBody] Workout workout)
        {
            if (!ModelState.IsValid)
            {
                return BadRequest(ModelState);
            }

            _context.Workout.Add(workout);
            await _context.SaveChangesAsync();

            return CreatedAtAction("GetWorkout", new { id = workout.Id }, workout);
        }

        // DELETE: api/Workouts/5
        [HttpDelete("{id}")]
        public async Task<IActionResult> DeleteWorkout([FromRoute] int id)
        {
            if (!ModelState.IsValid)
            {
                return BadRequest(ModelState);
            }

            var workout = await _context.Workout.SingleOrDefaultAsync(m => m.Id == id);
            if (workout == null)
            {
                return NotFound();
            }

            _context.Workout.Remove(workout);
            await _context.SaveChangesAsync();

            return Ok(workout);
        }

        private bool WorkoutExists(int id)
        {
            return _context.Workout.Any(e => e.Id == id);
        }
    }
}
Note that methods for all CRUD (Create, Read, Update, Delete) operations were created and that they are all already populated with fully working code.
The class itself is annotated with two attributes: Route telling the server that this controller should be used when the route starts with api/Workout, and Produces telling the server that the output should have a header which says that the content type is application/json.
Most methods are annotated with the HTTP action verb (e.g. HttpPost or HttpPut), which tells the controller which action should be called for each verb. This is done following the best practices of REST APIs: GET for listing data, POST for adding new records, PUT for updating existing records and DELETE for deleting.
The controller receives a WorkoutContext in the constructor and it saves and gets all data through it. The specific instance of the context will be dependency injected.
For a large application, you’ll want to avoid using the database context directly in the controller. You can split the logic of the application into the following layers:
- A data layer which has repositories that are in charge only of communicating with the database
- A service layer which has services that can process logic and communicate with the data layer to save and load data
- A presentation layer which includes the API controllers and does not have a lot of logic, it just takes in information from the API, uses the services it needs for data processing and returns the results through the API
Now that you’ve created a controller, you can delete the sample ValuesController that was added to the project initially.
Configure the Database Connection on Startup
Another thing the controller scaffold did was alter the appsettings.json file which holds the settings. Specifically, it added this section:
"ConnectionStrings": {
    "WorkoutContext": "Server=(localdb)\\mssqllocaldb;Database=WorkoutContext-96b0f43c-71bb-4887-b9e3-cf768e432412;Trusted_Connection=True;MultipleActiveResultSets=true"
  }
This says that the WorkoutContext will connect to a database server and a specific database that is provided here. By default, it uses a local database on your machine called SQL Server LocalDB. You can change this to any database you like. If you need help building connection strings, you can use a connection string generator tool.
Also, if you open Startup.cs, in the ConfigureServices method you’ll notice this line has been added:
services.AddDbContext<WorkoutContext>(options =>
  options.UseSqlServer(Configuration.GetConnectionString("WorkoutContext")));
This registers the WorkoutContext as a service that can be injected, and it defines that it will use SQL Server and get the configuration from appsettings.json.
Create the Database
In the WorkoutContext you have defined what the tables should look like. You need to tell Entity Framework to use this information and create a database. In Visual Studio open the Package Manager Console (Tools → NuGet Package Manager → Package Manager Console).
Use the command:
Add-Migration Initial
This will create a Migrations folder in your solution and add a file called something like 2180401145609_Initial.cs. If you open it, you will notice it has the Up and Down methods. The Up method contains the code used to upgrade the database to the next version, while the Down method contains the code to downgrade to the previous version. At this point you have no database, so the goal is to upgrade from nothing to the current version. In the Package Manager Console use the command:
Update-Database
This has now created the database with the Workout table in it. You will need to add a new migration and run a database update in this way each time you change something that changes the database structure.
Enable CORS
In order to call an API from JavaScript, you need to enable CORS on the API server. Since you’re building an API that will be called by an Angular app, you need CORS.
To enable CORS on your API, edit the Startup.cs. In the ConfigureServices method add CORS and a default policy:
services.AddCors(options =>
{
    options.AddPolicy("CorsPolicy",
        builder => builder.AllowAnyOrigin()
        .AllowAnyMethod()
        .AllowAnyHeader()
        .AllowCredentials());
});
In the Configure method tell the application to use the CorsPolicy on all requests. This must be placed before the UseMvc() statement:
app.UseCors("CorsPolicy");
app.UseMvc();
This allows any API request from any origin. If you want to allow this only for certain controllers or methods, you need to configure the policies as above, but then add theEnableCors attribute to specific controllers or methods.
Note: This setup leaves the API wide open for access. In production applications you might need to add more restrictions. Please check Microsoft’s documentation on enabling cross origin requests for more details.
Run and Test with Fiddler or Postman
Run your solution quickly and test it. Once it runs, basically nothing happens. However, the API is running and waiting for requests.
You can use a tool like Fiddler or Postman to verify it works properly (note that your port may be different):
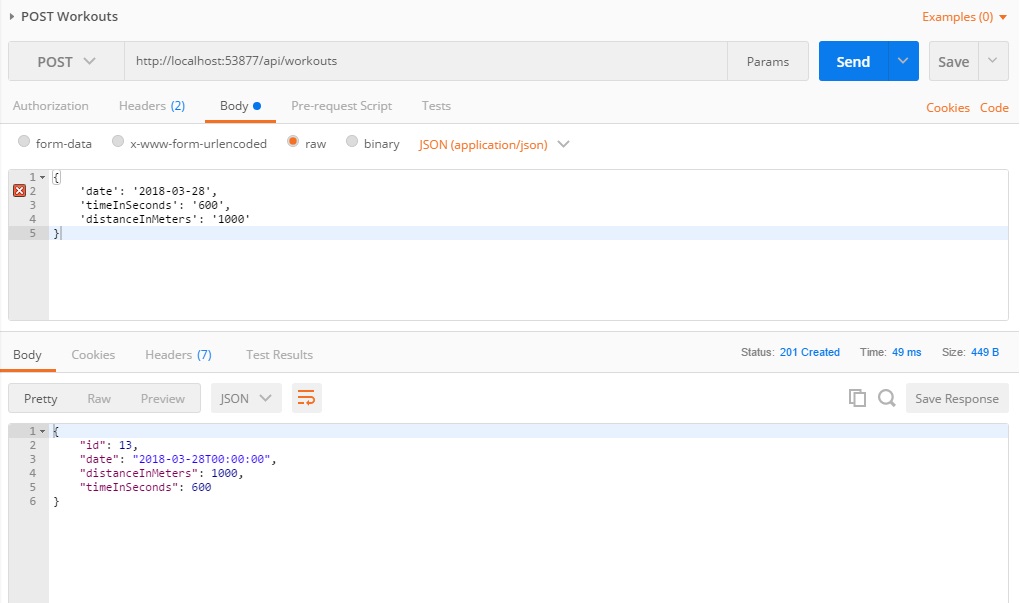
So as of now, your project works, right? Sort of. It works as long as the right data is submitted. However, you shouldn’t assume that will always be the case.
Validate Incoming Data
Adding a record with empty data (e.g. 'timeInSeconds' : '') would work. But from a user point of view it’s wrong. Let’s assume that we need the Date and the TimeInSeconds to be mandatory. We can easily do this by adding data annotations in the Workout model:
public class Workout
    {
        public int Id { get; set; }

        [Required]
        public DateTimeOffset Date { get; set; }

        public int DistanceInMeters { get; set; }

        [Required]
        public long TimeInSeconds { get; set; }
    }
Note that in the controller each method has a section like:
if (!ModelState.IsValid)
{
    return BadRequest(ModelState);
}
The input model is validated against all data annotations for validation and the results are stored in ModelState. If invalid, the methods will return an error message of 401 Bad Request.
For now, let’s move on to the client side of the story, we’ll come back to the server side later on.
Build the Angular 5 Client Side Application
In order to create a new Angular 5 client side application, use Angular CLI. Angular CLI is a command line utility that can generate an Angular project for you. Not only can it create new projects, but it can also generate code. It’s a convenient tool because it also offers commands that will build and optimize your project for production. It uses webpack under the covers for building. If you want to learn more about webpack, I recommend webpack.academy.

You can find install instructions and learn the basics of Angular CLI at https://cli.angular.io. To check if it installed correctly, you can use the ng --version command in your command prompt. The version used for this tutorial is version 1.7.3.

In order to build the client side application, create a new folder called Frontend next to the Backend folder. Move to the Frontend folder and use the command:
ng new JoggingDiary
This will create a folder called JoggingDiary and everything you need for an Angular 5 app. For the look and feel we will just use Bootstrap. Simply add the bootstrap package using npm:
cd JoggingDiary
npm install bootstrap --save
And add it to the styles.css file:
@import '~bootstrap/dist/css/bootstrap.min.css'
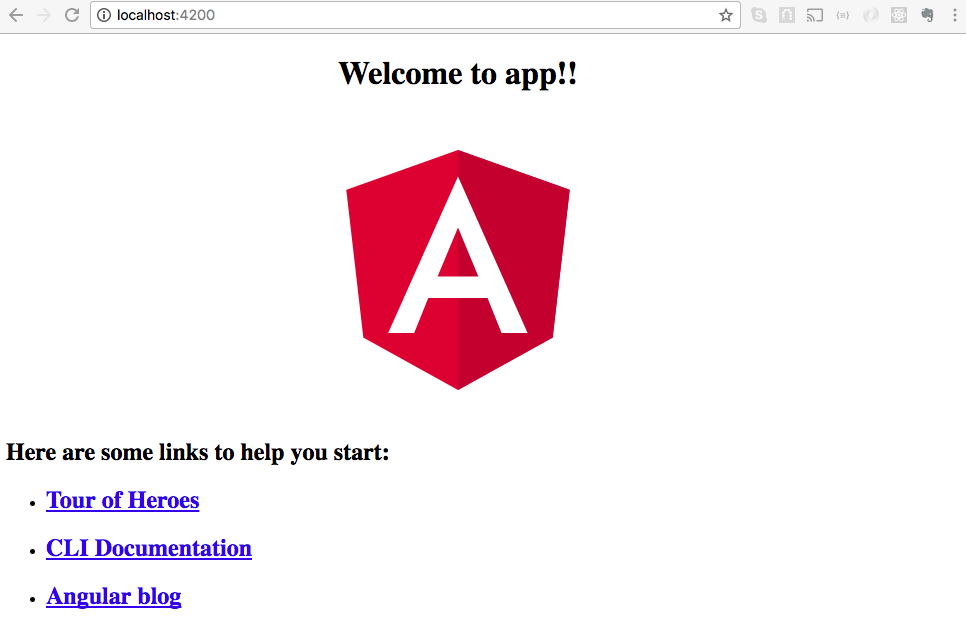
You can run the application directly by running the command:
ng serve
and visiting http://localhost:4200 in your web browser. You should see the basic Angular 5 app:
If you take a look at the index.html file, you will notice that everything looks like classic HTML:
<!doctype html>
<html lang="en">
<head>
  <meta charset="utf-8">
  <title>app</title>
  <base href="/">

  <meta name="viewport" content="width=device-width, initial-scale=1">
  <link rel="icon" type="image/x-icon" href="favicon.ico">
</head>
<body>
  <app-root></app-root>
</body>
</html>
Except the <app-root> tag. This one is not in the HTML specification, and is in fact a part of Angular 5.
There are some Angular 5 building blocks you should understand before we go any further:
Modules are the building blocks of the application. Each application must have at least one module we call the root module, and by default it is defined in the app.module.ts. Modules can have multiple components and services.
Components are used to define parts of your application. A component consists of a view and a class where the view defines the look of the component (HTML) and the class defines the behavior (TypeScript). Every app must have at least one component, the root component, usually in app.component. files.
Services are objects that are wired together using dependency injection. They allow easy reuse of parts of the application logic across multiple applications. Normally the components are not supposed to be in charge of fetching the data and saving the data, only for connecting it to the presentation layer, so all the fetching and saving is usually done inside a service.
In your application you will have a few components, which you’ll need to add:
- Home component with the home screen
- Grid view of all your jogging records
- Component used for updating or adding a new record
Components can easily be added again by using angular-cli and the ng generate component command. Move into the JoggingDiary folder and and add some components:
ng generate component Home
ng generate component GridJogging
ng generate component AddOrUpdateJogging
Add routing to your application in the app.module.ts file:
import { RouterModule, Routes } from '@angular/router';


// ...

const appRoutes: Routes = [
  { path: '', component: HomeComponent }

];

@NgModule({
  // ...
  imports: [
    // ...
    BrowserModule,
    RouterModule.forRoot(appRoutes)
  ],
  // ...
For more details on Angular routing you can check their official documentation. For our purposes, just know that whenever a user comes to the base URL(path == ''), the router will load the HomeComponent.
The root component is always loaded. However, the components defined in the router are loaded into a special placeholder that is in the root component HTML, defined by the <router-outlet>. Change the app.component.html file to:
<div class="container">
    <h1>Jogging diary</h1>
    <hr/>
</div>
<router-outlet></router-outlet>
This will make sure that the header and the horizontal rule are shown in every screen, and the <router-outlet></router-outlet> placeholder will be replaced by the content of the active view.
Let’s start with the GridJogging component first. Initially it looks like this:
import { Component, OnInit } from '@angular/core';

@Component({
  selector: 'app-grid-jogging',
  templateUrl: './grid-jogging.component.html',
  styleUrls: ['./grid-jogging.component.css']
})
export class GridJoggingComponent implements OnInit {

  constructor() { }

  ngOnInit() {
  }

}
Notice that this component (and every Angular component) has a constructor and a ngOnInit. The constructor is called when a component is being created, long before any data is passed into it. ngOnInit gets called after the first data change, so the data that this component will use is already available.
Your components will display data from the backend, and also send changes about the data to the backend using the API we just built. This type of communication is done by using a service. Add a new service using the ng generate command:
ng generate service Workout
This generates the workout.service.ts file and workout.service.spec.ts file. Change the workout.service.ts to:
import { Injectable } from '@angular/core';
import { HttpClient, HttpHeaders } from '@angular/common/http';

@Injectable()
export class WorkoutService {
  private headers: HttpHeaders;
  private accessPointUrl: string = 'http://localhost:53877/api/workouts';

  constructor(private http: HttpClient) {
    this.headers = new HttpHeaders({'Content-Type': 'application/json; charset=utf-8'});
  }

  public get() {
    // Get all jogging data
    return this.http.get(this.accessPointUrl, {headers: this.headers});
  }

  public add(payload) {
    return this.http.post(this.accessPointUrl, payload, {headers: this.headers});
  }

  public remove(payload) {
    return this.http.delete(this.accessPointUrl + '/' + payload.id, {headers: this.headers});
  }

  public update(payload) {
    return this.http.put(this.accessPointUrl + '/' + payload.id, payload, {headers: this.headers});
  }
}
Note that we are importing HttpClient and HttpHeaders from @angular/common/http. HttpClient makes sending HTTP requests to the server easy. HttpHeaders will be used to make HTTP Header definitions for these requests easy.
We also need to update the app.module.ts to include the HttpClient module and the WorkoutService:
// ...
import { WorkoutService } from './workout.service';
import { HttpClientModule } from '@angular/common/http';
// ...

@NgModule({
  // ...
  imports: [
    BrowserModule,
    RouterModule.forRoot(appRoutes),
    HttpClientModule
    // ...
  ],
  providers: [
    WorkoutService
  ],

  // ...
})
export class AppModule { }
Next, build the HTML that will display the actual data on screen. You can add a column that will display average speed. Edit the template of the GridJogging component (grid-jogging-component.html):
<a href="#" id="new-button">New</a>
<table>
<thead>
    <tr>
        <th>Date</th>
        <th>Distance in meters</th>
        <th>Time</th>
        <th>Average speed</th>
        <th>Commands</th>
    </tr>
</thead>
<tbody>
    <tr *ngFor="let joggingInfo of joggingData">
        <td>{{ joggingInfo.date | date:'shortDate' }}</td>
        <td>{{ joggingInfo.distanceInMeters | number: '1.2-2' }}</td>
        <td>{{ joggingInfo.timeInSeconds / 60 | number: '1.0-0' }}:{{ joggingInfo.timeInSeconds % 60 |number: '2.0-0' }}</td>
        <td>{{ (joggingInfo.distanceInMeters / joggingInfo.timeInSeconds) * 3.6 | number:'1.2-2' }}</td>
        <td>
            <a href="#" (click)="editRecord(this)">Edit</a>
            <a href="#" (click)="deleteRecord(this)">Delete</a>
        </td>
    </tr>
</tbody>
</table>
The {{handlebars}} are just a placeholder for data populated by Angular. You can also do some basic calculations in there.
*ngFor is an Angular directive that makes this particular block repeat itself for every array member of joggingData. In each iteration, the current object will be referenced as joggingInfo. So, we are just printing a row of a table with data for each array member.
Filters were added for data formatting. You can read more about the date filter and the number filter in the Angular docs.
Do note we need to include Pipes in the app.module.ts:
import { DecimalPipe } from '@angular/common';
import { DatePipe } from '@angular/common';
It is necessary to have the Home component get the actual data from the WorkoutService. In the home.component.ts add the service:
import { WorkoutService } from '../workout.service'

// ...

export class HomeComponent implements OnInit {
  public joggingData: Array<any>;
  public currentJogging: any;

  constructor (private workoutService: WorkoutService) {
    workoutService.get().subscribe((data: any) => this.joggingData = data);
  }

  // ...
HttpClient methods return observables. Here it says that you want your Home component to subscribe to any changes made by the workoutService.get() method, and when new changed data is received, to store it to this.joggingData.
You have defined the data in the home.component.ts, but not in the GridJogging component. However, we want the GridJogging component to get the data as an input parameter, so that whichever other component is using it can feed it with data. You’ll need to edit the GridJogging component:
import { Component, Input, OnInit } from '@angular/core';
// ...
export class GridJoggingComponent implements OnInit {

  @Input() joggingData: Array<any>;

  // ...
}
Now all that’s left is to edit the template of our Home component and add the GridJogging component there:
<app-grid-jogging [joggingData]="joggingData"></app-grid-jogging>
Note how the input parameter [joggingData] which is defined in the GridJogging component will get the value of the joggingData variable defined in the Home component. You can edit the styling of just this component without affecting the styling of any other component. Simply add some code to the grid-jogging.component.css file:
table {
    margin-top: 1.5em;
}

tbody td {
    text-align: right;
}
Now we need to create the component to add new data. In our add-or-update-jogging.component.html add this HTML:
<div>
    <h2></h2>
    <form>
        <div class="form-group">
            <label for="date-input">Jogging date:</label>
            <input type="date" id="date-input" [(ngModel)]="joggingInfo.date" class="form-control" />
        </div>
        <div class="form-group">
            <label for="distance-input">Distance (m)</label>
            <input type="number" id="distance-input" [(ngModel)]="joggingInfo.distanceInMeters" class="form-control" />
        </div>
        <div class="form-group">
            <label for="time-input">Time (s)</label>
            <input type="number" id="time-input" [(ngModel)]="joggingInfo.timeInSeconds" (input)="joggingInfo.timeInSeconds = $event.target.value" class="form-control" />
        </div>
        <button type="button" class="btn btn-primary" (click)="addOrUpdateJoggingRecord($event);">Save</button>

    </form>
   </div>
You will notice the [(ngModel)] tag. This indicates a two-way binding between the value of the HTML element and the object provided. In other words: as you type, the value of the object changes instantly and if you change the object’s value from another place, the input box value will be updated immediately.
For this to work, in the app.module.ts we need to import the Forms module:
import { FormsModule } from '@angular/forms';

//...
@NgModule({
  //...
  imports: [
    //...
    FormsModule
  ]
})
In Angular, in order to raise an event (and don’t think of these events as classic Javascript events) we need to have an output parameter. This output parameter will return an EventEmitter. Also, you’ll need a function that will emit the new data when “Save” is clicked. You’ll also need an input parameter joggingInfo because you’ll use the same component for adding and updating. So if the parameter passed here has an ID, then you are dealing with an update operation, otherwise it is a create operation. In this component code add:
import { Component, EventEmitter, Input, Output, OnInit } from '@angular/core';

// ...
export class AddOrUpdateJoggingComponent implements OnInit {
  @Output() joggingCreated = new EventEmitter<any>();
  @Input() joggingInfo: any;

  public buttonText = 'Save';

  constructor() {
    this.clearJoggingInfo();
    console.log(this.joggingInfo.date);
  }

  ngOnInit() {

  }

  private clearJoggingInfo = function() {
    // Create an empty jogging object
    this.joggingInfo = {
      id: undefined,
      date: '',
      distanceInMeters: 0,
      timeInSeconds: 0
    };
  };

  public addOrUpdateJoggingRecord = function(event) {
    this.joggingCreated.emit(this.joggingInfo);
    this.clearJoggingInfo();
  };
}
When adding this component to your home component’s HTML change the home.component.html to:
<div class="row">
    <div class="col-md-4">
        <app-add-or-update-jogging (joggingCreated)="createOrUpdateJogging($event)" [joggingInfo]="currentJogging"></app-add-or-update-jogging>
    </div>
    <div class="col-md-8">
        <app-grid-jogging [joggingData]="joggingData" (editClicked)="editClicked($event)" (newClicked)="editClicked($event)" (recordDeleted)="deleteClicked($event)"></app-grid-jogging>
    </div>
  </div>
Now add a public function createOrUpdateJogging to the home.component.ts that subscribes to the workoutService. Also, add a method that creates an empty jogging record and initialize the currentJogging property in the constructor:
constructor ( public oktaAuth: OktaAuthService, private workoutService: WorkoutService) {
  //...
  this.currentJogging = this.setInitialValuesForJoggingData();
}

private setInitialValuesForJoggingData () {
    return {
      id: undefined,
      date: '',
      distanceInMeters: 0,
      timeInSeconds: 0
    }
  }

public createOrUpdateJogging = function(jogging: any) {
    // if jogging is present in joggingData, we can assume this is an update
    // otherwise it is adding a new element
    let joggingWithId;
    joggingWithId = _.find(this.joggingData, (el => el.id === jogging.id));

    if (joggingWithId) {
      const updateIndex = _.findIndex(this.joggingData, {id: joggingWithId.id});
      this.workoutService.update(jogging).subscribe(
        joggingRecord =>  this.joggingData.splice(updateIndex, 1, jogging)
      );
    } else {
      this.workoutService.add(jogging).subscribe(
        joggingRecord => this.joggingData.push(jogging)
      );
    }

    this.currentJogging = this.setInitialValuesForJoggingData();
  };
This code checks if the record passed to the function exists in the joggingData array by comparing IDs. If so, it assumes that the required operation needed is an update, and then subscribes to the workoutService.update() method. Otherwise, it subscribes to the workoutService.add() method for creating a new record. Once a record is successfully created or updated, the joggingData array is updated with new information.
To simplify, I’m using Lodash through npm:
npm install --save lodash
You need to add Lodash both in app.module.ts and home.component.ts:
import * as _ from 'lodash';
Update the AddOrUpdateJoggingComponent to change the title based on whether a record ID is provided. If there is an ID provided, the title will be “Add a record”, otherwise it will be “Update a record”.
<h2 *ngIf="!joggingInfo || joggingInfo.id === undefined">Add record</h2>
<h2 *ngIf="joggingInfo && joggingInfo.id !== undefined">Update record (ID: )</h2>
So, from your grid component there are a few more things missing. The “New” button does not do anything, nor do the links for Edit and Delete. To solve for this, add these functions:
import { Component, EventEmitter, Input, Output, OnInit } from '@angular/core';

// ...
export class GridJoggingComponent implements OnInit {
  @Output() recordDeleted = new EventEmitter<any>();
  @Output() newClicked = new EventEmitter<any>();
  @Output() editClicked = new EventEmitter<any>();
  @Input() joggingData: Array<any>;

  // ...

  public deleteRecord(record) {
    this.recordDeleted.emit(record);
  }

  public editRecord(record) {
    const clonedRecord = Object.assign({}, record);
    this.editClicked.emit(clonedRecord);

  }

  public newRecord() {
    this.newClicked.emit();
  }
}
And now we just connect it to the AddOrUpdateComponent and workoutService inside the Home component, like we did earlier:
// ...

public editClicked = function(record) {
    this.currentJogging = record;
  };

  public newClicked = function() {
    this.currentJogging = this.setInitialValuesForJoggingData();
  };

  public deleteClicked(record) {
    const deleteIndex = _.findIndex(this.joggingData, {id: record.id});
    this.workoutService.remove(record).subscribe(
      result => this.joggingData.splice(deleteIndex, 1)
    );
  }
Update the home.component.html to make sure all these event handlers are properly connected to the accompanying events:
<app-grid-jogging [joggingData]="joggingData" (editClicked)="editClicked($event)" (newClicked)="newClicked()" (recordDeleted)="deleteClicked($event)"></app-grid-jogging>
So, now you have a cool little application for tracking your workouts. But your app only supports your workouts, and no one else’s. Maybe that’s all you need, but we’re going to push forward and add user management, login, security… the works, with Okta.
Add Okta for User Authentication
OpenID Connect (OIDC) is built on top of the OAuth 2.0 protocol and allows clients to verify the identity of the user as well as to obtain users’ basic profile information. Okta uses OpenID Connect to make it easy to add authentication and user management to your applications.
To integrate Okta for user authentication, you’ll first need to sign up for a free developer account and create an Okta application.
Log in to your Okta account, or create one if you don’t have one. Navigate to Applications and click on Add Application. Set your application up like this:
App type: Single-page Application
Login redirect URI: http://localhost:4200/implicit/callback
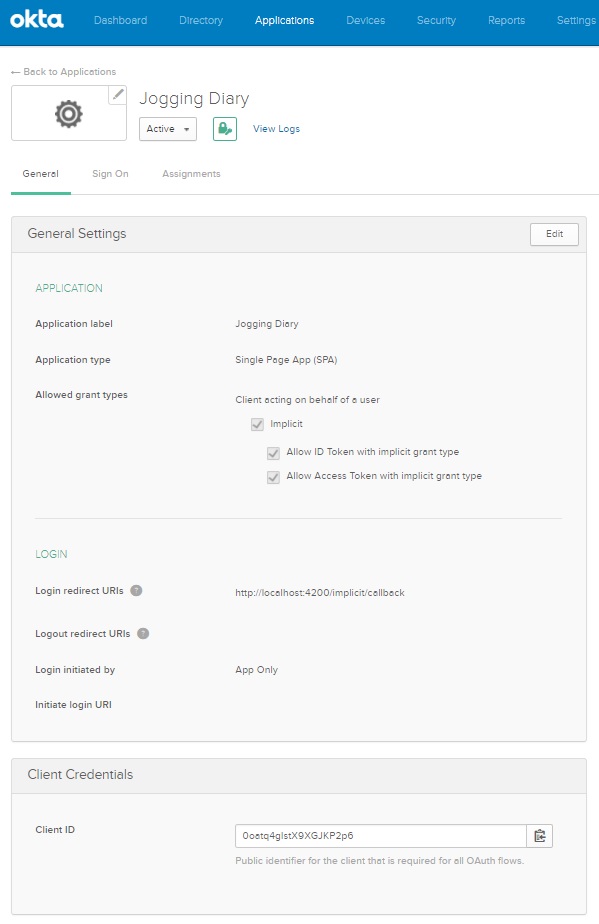
After creating the application, your client ID will be displayed on the General tab. You’ll need this client ID in a moment, so be sure to make note of it.
Connect Okta to Your Angular Application
Next, you want to add the Okta Angular SDK:
npm install --save @okta/okta-angular
You need to provide the data form your application set up in Okta into your root module. Add a config object like this:
const config = {
  issuer: 'https://{yourOktaDomain}/oauth2/default',
  redirectUri: 'http://localhost:4200/implicit/callback',
  clientId: '{clientId}',
  scope: 'openid profile email'
};
Notice you are redirecting a successful login to the http://localhost:4200/implicit/callback route. This route does not exist yet, so you’ll need to add it along with OktaAuthModule and the OktaCallbackComponent to your app.module.ts:
// ...

import {
  OktaAuthModule,
  OktaCallbackComponent,
} from '@okta/okta-angular';

// ...

const appRoutes: Routes = [
  { path: '', component: HomeCompnent},
  { path: 'implicit/callback', component: OktaCallbackComponent }
];

@NgModule({
  declarations: [
    // ...
    AddOrUpdateJoggingComponent,

  ],
  imports: [
    BrowserModule,
    RouterModule.forRoot(appRoutes),
    HttpClientModule,
    OktaAuthModule.initAuth(config)
  ],

  // ...
})
export class AppModule { }
And that’s it! Your Angular application is using Okta for authentication and authorization.
When you are authenticated with Okta (as with any OpenID Connect provider), you need to send your token in an authorization header on each HTTP request. In order to avoid adding code to every HTTP request in every service, you can create an HTTP interceptor. This will “intercept” every HTTP request and add the authorization header to it. Create a /src/app/auth.interceptor.ts file:
import { Injectable } from '@angular/core';
import { HttpRequest, HttpHandler, HttpEvent, HttpInterceptor } from '@angular/common/http';
import { Observable } from 'rxjs/Observable';
import 'rxjs/add/observable/fromPromise';
import 'rxjs/add/operator/mergeMap';

import { OktaAuthService } from '@okta/okta-angular';

@Injectable()
export class AuthInterceptor implements HttpInterceptor {

  constructor(private oktaAuth: OktaAuthService) {
  }

  intercept(request: HttpRequest<any>, next: HttpHandler): Observable<HttpEvent<any>> {
    return this.isAuthenticated()
      .mergeMap((isAuthenticated) => {
        if (!isAuthenticated) {
          return next.handle(request);
        }

        return this.getAccessToken()
          .mergeMap((accessToken) => {
            request = request.clone({
              setHeaders: {
                Authorization: `Bearer ${accessToken}`
              }
            });

            return next.handle(request);
          })
      });
  }

  private isAuthenticated() : Observable<boolean> {
    return Observable.fromPromise(this.oktaAuth.isAuthenticated());
  }

  private getAccessToken() : Observable<string> {
    return Observable.fromPromise(this.oktaAuth.getAccessToken());
  }
}
Make sure to import this interceptor in app.module.ts:
// ...
import { HTTP_INTERCEPTORS } from '@angular/common/http';
import { AuthInterceptor } from './auth.interceptor';

// ...

@NgModule({
  // ...
  providers: [
    WorkoutService,
    { provide: HTTP_INTERCEPTORS, useClass: AuthInterceptor, multi: true }
  ],

  // ...
})
In order for the authentication to work, we will make the Home component display a message with a Log in button if you are not authenticated, and add a Logout button if you are. Update the home.component.html:
<div class="container" *ngIf="!isAuthenticated">
  <div class="row">
    <div class="col-md-12">
      <p class="text-center">The coolest application for tracking jogging times you'll ever use.</p>
      <p class="text-center">
        <button class="btn btn-primary" (click)="oktaAuth.loginRedirect();">Log in</button>
      </p>
    </div>
  </div>
</div>
<div class="container" *ngIf="isAuthenticated">
  <div class="row">
    <div class="col-md-12 text-right">
      <button class="btn" (click)="oktaAuth.logout();">Log out</button>
    </div>
  </div>
  <div class="row">
    <div class="col-md-4">
        <app-add-or-update-jogging (joggingCreated)="createOrUpdateJogging($event)" [joggingInfo]="currentJogging"></app-add-or-update-jogging>
    </div>
    <div class="col-md-8">
        <app-grid-jogging [joggingData]="joggingData" (editClicked)="editClicked($event)" (newClicked)="newClicked()" (recordDeleted)="deleteClicked($event)"></app-grid-jogging>
    </div>
  </div>
</div>
In the Home component we need to import OktaAuth service. OktaAuth has a isAuthenticated() method which returns an observable. So, inside the component you need to get the initial value and subscribe to the changes. This is done in the constructor. The result of these operations will be exposed to the template through a public isAuthenticated property:
import { OktaAuthService } from '@okta/okta-angular';

// ...

export class HomeComponent {
  public joggingData: Array<any>;
  public currentJogging: any;
  public isAuthenticated: boolean;

  constructor ( public oktaAuth: OktaAuthService, private workoutService: WorkoutService) {
    // get authentication state for immediate use
    this.oktaAuth.isAuthenticated().then(result => {
      this.isAuthenticated = result;
    });

    // subscribe to authentication state changes
    this.oktaAuth.$authenticationState.subscribe(
      (isAuthenticated: boolean)  => this.isAuthenticated = isAuthenticated
    );

    workoutService.get().subscribe((data: any) => this.joggingData = data);
    this.currentJogging = this.setInitialValuesForJoggingData();
  }
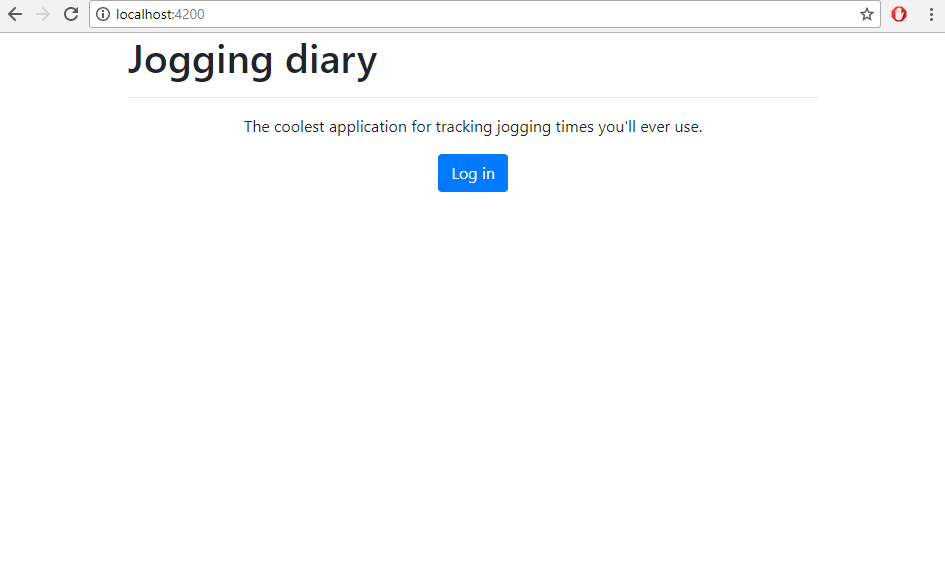
When you open the app and are not logged in, you’ll see the demo text and the Log in button:
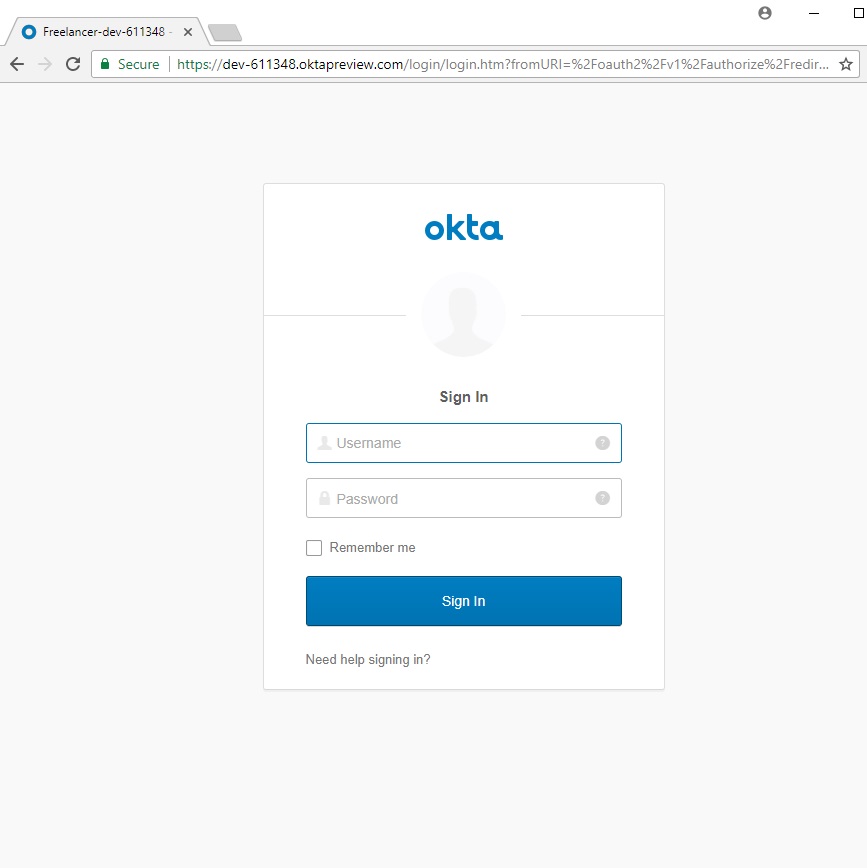
When you click Log in you should get to an Okta login interface:
Sign in and you’re in the app and can see the grid and the component to add or update records.
So are you done? Almost!
Connect Okta to ASP.NET Core
You want to make sure that your API can only be accessed by a user that was authenticated by Okta and has a valid token. To do that, you need to set up authorization inside the ASP.NET Core application.
Add the JwtBearer authentication in Startup.cs.
services.AddAuthentication(JwtBearerDefaults.AuthenticationScheme)
    .AddJwtBearer(options =>
    {
        options.Authority = "https://{yourOktaDomain}/oauth2/default";
        options.Audience = "api://default";
    });
In the configure method of the same file we need to add a app.UseAuthentication(); command to tell our server application that authentication will be used. Note that this should come before app.UseMvc();:
app.UseCors("CorsPolicy");

app.UseAuthentication();

app.UseMvc();
And thus, you have secured your API. Now you can add the [Authorize] attribute to any controller or method you wish to make unavailable to unauthorized users.
[Produces("application/json")]
[Route("api/Workouts")]
[Authorize]
public class WorkoutsController : Controller
{
    // ...
}
So, let’s recap. You’ve now built an application that has user authentication and authorization on the server side, and can allow you to CRUD your jogging records, and those of your friends.
The only thing left is to make sure is that the logged in user only has access to their own records. Expand the model in Workout.cs by adding an additional property UserId. The Angular application does not need this property, so we will add a [JsonIgnore] data annotation so it is not sent to the client.
[JsonIgnore]
public string UserId { get; set; }
This information needs to be stored in the database, so add another migration using the Package Manager Console, and update the database:
Add-Migration AddedUserIdToWorkout
Update-Database
Update the controller to make sure that all checks around the user’s ID are carried out properly.
// GET: api/Workouts
[HttpGet]
public async Task<IEnumerable<Workout>> GetWorkout()
{
    var userId = User.Claims.FirstOrDefault(c => c.Type == "uid")?.Value;

    return await _context.Workout
        .Where(u => u.UserId == userId)
        .OrderByDescending(d => d.Date)
        .ToArrayAsync();
}


// GET: api/Workouts/5
[HttpGet("{id}")]
public async Task<IActionResult> GetWorkout([FromRoute] int id)
{
    if (!ModelState.IsValid)
    {
        return BadRequest(ModelState);
    }

    var userId = User.Claims.FirstOrDefault(c => c.Type == "uid")?.Value;
    var workout = await _context.Workout.SingleOrDefaultAsync(m => m.Id == id && m.UserId == userId);

    if (workout == null)
    {
        return NotFound();
    }

    return Ok(workout);
        }

// PUT: api/Workouts/5
[HttpPut("{id}")]
public async Task<IActionResult> PutWorkout([FromRoute] int id, [FromBody] Workout workout)
{
    if (!ModelState.IsValid)
    {
        return BadRequest(ModelState);
    }

    if (id != workout.Id)
    {
        return BadRequest();
    }

    var userId = User.Claims.FirstOrDefault(c => c.Type == "uid")?.Value;
    if(_context.Workout.FirstOrDefault(c => c.UserId == userId && c.Id == id) == null)
    {
      return NotFound();
    }


    _context.Entry(workout).State = EntityState.Modified;

    try
    {
        await _context.SaveChangesAsync();
    }
    catch (DbUpdateConcurrencyException)
    {
        if (!WorkoutExists(id))
        {
            return NotFound();
        }
        else
        {
            throw;
        }
    }

    return NoContent();
}

// POST: api/Workouts
[HttpPost]
public async Task<IActionResult> PostWorkout([FromBody] Workout workout)
{
    if (!ModelState.IsValid)
    {
        return BadRequest(ModelState);
    }

    var userId = User.Claims.FirstOrDefault(c => c.Type == "uid")?.Value;
    workout.UserId = userId;

    _context.Workout.Add(workout);
    await _context.SaveChangesAsync();

    return CreatedAtAction("GetWorkout", new { id = workout.Id }, workout);
}

// DELETE: api/Workouts/5
[HttpDelete("{id}")]
public async Task<IActionResult> DeleteWorkout([FromRoute] int id)
{
    if (!ModelState.IsValid)
    {
        return BadRequest(ModelState);
    }

    var userId = User.Claims.FirstOrDefault(c => c.Type == "uid")?.Value;
    var workout = await _context.Workout.SingleOrDefaultAsync(m => m.Id == id && m.UserId == userId);
    if (workout == null)
    {
        return NotFound();
    }

    _context.Workout.Remove(workout);
    await _context.SaveChangesAsync();

    return Ok(workout);
}
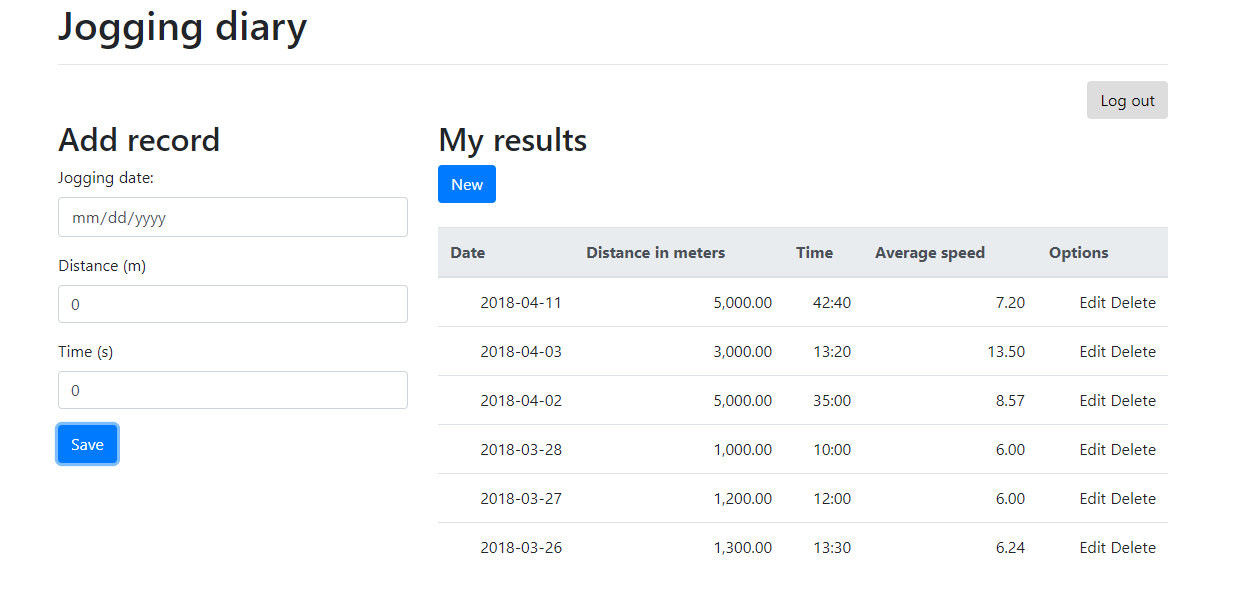
In the end you should have a basic jogging diary app:
Now you just need some people, and to get jogging!
Build More with ASP.NET Core and Angular
Interested in digging in deeper with ASP.NET Core, Angular, or Okta? We’ve got you covered. Check out the following resources for more cool projects:
- Add Authentication to Your Angular PWA
- Token Authentication in ASP.NET Core - A Complete Guide
- Build Your First Progressive Web App with Angular and Spring Boot
- Play Zork, Learn OAuth
- User Authorization in ASP.NET Core with Okta
And as always, we’d love to connect! Leave us a comment below, check out our developer forum, or hit us up on Twitter @oktadev!
Okta Developer Blog Comment Policy
We welcome relevant and respectful comments. Off-topic comments may be removed.